") OpenHAB和Zwave的入門(mén)指南
OpenHAB和Zwave的入門(mén)指南
步驟1:Raspbian設(shè)置
*** **** raspbian初始設(shè)置*******(假設(shè)所有用戶(hù)均為pi)
將語(yǔ)言設(shè)置為美國(guó)英語(yǔ)
擴(kuò)展文件系統(tǒng)
(可選)高級(jí)-》重命名主機(jī)
sudo apt-get update
sudo apt-get upgrade
******* raspbian可選NTP更新*******
sudo apt-get install ntp
cd 。.
sudo nano etc/ntp.conf
使用以下命令更新ntp.conf文件。
# pool.ntp.org maps to about 1000 low-stratum NTP servers. Your server will
# pick a different set every time it starts up. Please consider joining the
# pool:
# server 0.debian.pool.ntp.org iburst
# server 1.debian.pool.ntp.org iburst
# server 2.debian.pool.ntp.org iburst
# server 3.debian.pool.ntp.org iburst
server 0.us.pool.ntp.org
server 1.us.pool.ntp.org
server 2.us.pool.ntp.org
server 3.us.pool.ntp.org
******* raspbian可選,重命名主機(jī)*********
sudo nano /etc/hosts
使用更改來(lái)更新文件
127.0.1.1 YOURPINAME
是raspberrypi(默認(rèn))
sudo nano /etc/hostname
使用更改來(lái)更新文件
YOURPINAME
sudo /etc/init.d/hostname.sh
******* raspbian可選靜態(tài)地址*********
(我發(fā)現(xiàn)這是需要準(zhǔn)確性的,不太可靠。建議您通過(guò)家庭路由器為Pi分配一個(gè)靜態(tài)地址。)
sudo nano /etc/network/interfaces
使用所做的更改更新文件
auto lo
iface lo inet loopback
auto eth0
allow-hotplug eth0
iface eth0 inet dhcp
auto wlan0
allow-hotplug wlan0
iface wlan0 inet dhcp
#address XXX.XXX.XXX.XXX
#netmask XXX.XXX.XXX.XXX
#gateway XXX.XXX.XXX.XXX
#network XXX.XXX.XXX.XXX
#broadcast XXX.XXX.XXX.XXX
wpa-ssid YOURSSID
wpa-psk YOURSSIDPASSWORD sudo service networking restart
******* raspbian可選wifi訪問(wèn)*********
sudo nano /etc/wpa_supplicant/wpa_supplicant.conf
使用chang更新文件es
ctrl_interface=DIR=/var/run/wpa_supplicant GROUP=netdev
update_config=1 network={
ssid=“YOURSSID”
psk=“YOURSSIDPASSWORD”
proto=RSN
key_mgmt=WPA-PSK
pairwise=TKIP
auth_alg=OPEN
} sudo reboot
步驟2:OpenHAB設(shè)置
******* openHAB安裝*******
有關(guān)這些步驟的詳細(xì)信息,請(qǐng)點(diǎn)擊此處。
sudo mkdir /opt/openhab cd /opt/openhab
sudo wget https://bintray.com/artifact/download/openhab/bin.。.》》
(檢查當(dāng)前版本)
sudo unzip distribution-1.7.1-runtime.zip sudo rm distribution-1.7.1-runtime.zip
cd addons/
sudo wget https://bintray.com/artifact/download/openhab/bin.。.
sudo unzip distribution-1.7.1-addons.zip
(這些是我指的附件。以后可以刪除未使用的附件)
sudo rm distribution-1.7.1-addons.zip cd 。. sudo cp configurations/openhab_default.cfg configurations/openhab.cfg
讓我們根據(jù)這篇文章將openHAB設(shè)置為自動(dòng)運(yùn)行。此代碼中的默認(rèn)用戶(hù)為“ Ben”。但是,我從未設(shè)置過(guò)用戶(hù),并且在我們的安裝中也沒(méi)關(guān)系。
cd /opt/openhab sudo nano /etc/init.d/openhab
(通過(guò)粘貼到文件中添加此代碼。)
#! /bin/sh
### BEGIN INIT INFO
# Provides: openhab
# Required-Start: $remote_fs $syslog
# Required-Stop: $remote_fs $syslog
# Default-Start: 2 3 4 5
# Default-Stop: 0 1 6
# Short-Description: OpenHAB Daemon
### END INIT INFO
# Author: Thomas Brettinger
# Do NOT “set -e”
# PATH should only include /usr/* if it runs after the mountnfs.sh script
PATH=/sbin:/usr/sbin:/bin:/usr/bin
DESC=“Open Home Automation Bus Daemon”
NAME=openhab
DAEMON=/usr/bin/java
PIDFILE=/var/run/$NAME.pid
SCRIPTNAME=/etc/init.d/$NAME
ECLIPSEHOME=“/opt/openhab”;
HTTPPORT=8080
HTTPSPORT=8443
TELNETPORT=5555
#RUN_AS=ben
# get path to equinox jar inside $eclipsehome folder
cp=$(find $ECLIPSEHOME/server -name “org.eclipse.equinox.launcher_*.jar” | sort | tail -1);
DAEMON_ARGS=“-Dosgi.clean=true -Declipse.ignoreApp=true -Dosgi.noShutdown=true -Djetty.port=$HTTPPORT -Djetty.port.ssl=$HTTPSPORT -Djetty.home=$ECLIPSEHOME -Dlogback.configurationFile=$ECLIPSEHOME/configurations/logback.xml -Dfelix.fileinstall.dir=$ECLIPSEHOME/addons -Djava.library.path=$ECLIPSEHOME/lib -Djava.security.auth.login.config=$ECLIPSEHOME/etc/login.conf -Dorg.quartz.properties=$ECLIPSEHOME/etc/quartz.properties -Djava.awt.headless=true -jar $cp -console ${TELNETPORT}”
# Exit if the package is not installed
[ -x “$DAEMON” ] || exit 0
# Read configuration variable file if it is present
[ -r /etc/default/$NAME ] && 。 /etc/default/$NAME
# Load the VERBOSE setting and other rcS variables
。 /lib/init/vars.sh
# Define LSB log_* functions.
# Depend on lsb-base (》= 3.2-14) to ensure that this file is present
# and status_of_proc is working.
。 /lib/lsb/init-functions
#
# Function that starts the daemon/service
#
do_start()
{
# Return
# 0 if daemon has been started
# 1 if daemon was already running
# 2 if daemon could not be started
start-stop-daemon --start --quiet --make-pidfile --pidfile $PIDFILE --chuid $RUN_AS --chdir $ECLIPSEHOME --exec $DAEMON --test 》 /dev/null \
|| return 1
start-stop-daemon --start --quiet --background --make-pidfile --pidfile $PIDFILE --chuid $RUN_AS --chdir $ECLIPSEHOME --exec $DAEMON -- $DAEMON_ARGS \
|| return 2
# Add code here, if necessary, that waits for the process to be ready
# to handle requests from services started subsequently which depend
# on this one. As a last resort, sleep for some time.
return 0
}
#
# Function that stops the daemon/service
#
do_stop()
{
# Return
# 0 if daemon has been stopped
# 1 if daemon was already stopped
# 2 if daemon could not be stopped
# other if a failure occurred
start-stop-daemon --stop --quiet --retry=TERM/30/KILL/5 --pidfile $PIDFILE --name $NAME
RETVAL=“$?”
[ “$RETVAL” = 2 ] && return 2
# Wait for children to finish too if this is a daemon that forks
# and if the daemon is only ever run from this initscript.
# If the above conditions are not satisfied then add some other code
# that waits for the process to drop all resources that could be
# needed by services started subsequently. A last resort is to
# sleep for some time.
start-stop-daemon --stop --quiet --oknodo --retry=0/30/KILL/5 --exec $DAEMON
[ “$?” = 2 ] && return 2
# Many daemons don‘t delete their pidfiles when they exit.
rm -f $PIDFILE
return “$RETVAL”
}
#
# Function that sends a SIGHUP to the daemon/service
#
do_reload() {
#
# If the daemon can reload its configuration without
# restarting (for example, when it is sent a SIGHUP),
# then implement that here.
#
do_stop
sleep 1
do_start
return 0
}
case “$1” in
start)
log_daemon_msg “Starting $DESC”
do_start
case “$?” in
0|1) log_end_msg 0 ;;
2) log_end_msg 1 ;;
esac
;;
stop)
log_daemon_msg “Stopping $DESC”
do_stop
case “$?” in
0|1) log_end_msg 0 ;;
2) log_end_msg 1 ;;
esac
;;
status)
status_of_proc “$DAEMON” “$NAME” && exit 0 || exit $?
;;
#reload|force-reload)
#
# If do_reload() is not implemented then leave this commented out
# and leave ’force-reload‘ as an alias for ’restart‘。
#
#log_daemon_msg “Reloading $DESC” “$NAME”
#do_reload
#log_end_msg $?
#;;
restart|force-reload)
#
# If the “reload” option is implemented then remove the
# ’force-reload‘ alias
#
log_daemon_msg “Restarting $DESC”
do_stop
case “$?” in
0|1)
do_start
case “$?” in
0) log_end_msg 0 ;;
1) log_end_msg 1 ;; # Old process is still running
*) log_end_msg 1 ;; # Failed to start
esac
;;
*)
# Failed to stop
log_end_msg 1
;;
esac
;;
*)
#echo “Usage: $SCRIPTNAME {start|stop|restart|reload|force-reload}” 》&2
echo “Usage: $SCRIPTNAME {start|stop|status|restart|force-reload}” 》&2
exit 3
;;
esac
:
sudo chmod a+x /etc/init.d/openhab sudo update-rc.d openhab defaults sudo nano etc/rc.local
(通過(guò)粘貼到文件中添加此代碼。某些行可能已經(jīng)存在,因此請(qǐng)粘貼缺少的內(nèi)容)
# By default this script does nothing.
# By default this script does nothing.
sudo /opt/openhab/start.sh
fbset -xres 16 -yres 16 -vres 16 -depth 8
/opt/vc/bin/tvservice -o
# Print the IP address
_IP=$(hostname -I) || true
if [ “$_IP” ]; then
printf “My IP address is %s ” “$_IP”
fi
exit 0
******* openHAB可選演示安裝開(kāi)始*******
sudo wget https://github.com/openhab/openhab/releases/download/v1.6.2/distribution-1.6.2-demo-configuration.zip
cd /opt/openhab sudo unzip distribution-1.6.2-demo-configuration.zip sudo rm distribution-1.6.2-demo-configuration.zip sudo chmod +x start.sh sudo 。/start.sh
去檢查一下。
http://192.168.X.XXX:8080/openhab.app?sitemap = demo 。..(使用您的Pi的IP地址)
步驟3:綁定和您的第一個(gè)開(kāi)關(guān)

******* openHAB可選Samba安裝**** ***
(用于輕松訪問(wèn)配置文件。CATION-您具有刪除/修改的root權(quán)限)
sudo apt-get install samba samba-common-bin sudo nano /etc/samba/smb.conf # Change this to the worgroup/NT-domain name your Samba server will part of
workgroup = YOURWORKGROUP
# WINS Support - Tells the NMBD component of Samba to enable its WINS Server
wins support = yes
#add to the last line
[OpenHAB]
comment = OpenHAB
path = /opt/openhab
browseable = Yes
writeable = Yes
only guest = no
create mask = 0777
directory mask = 0777
public = no
force user = root sudo smbpasswd -a pi
(將密碼設(shè)置為所需的任意值)
您現(xiàn)在應(yīng)該可以從PC(通過(guò)LAN)訪問(wèn)openHAB目錄。
******* openHAB設(shè)計(jì)器*********
下載并按照安裝說(shuō)明進(jìn)行操作。
https://bintray.com/artifact/download/openhab/bin/。..
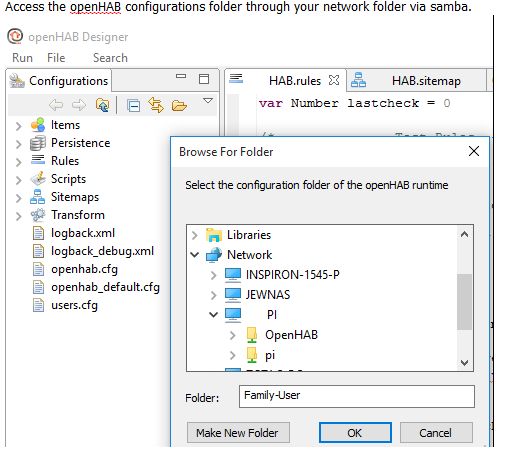
通過(guò)samba通過(guò)網(wǎng)絡(luò)文件夾訪問(wèn)openHAB配置文件夾。
[查看圖像]
******* openHAB zwave綁定*********
轉(zhuǎn)到此處獲取有關(guān)zwave網(wǎng)絡(luò)的更多信息http://www.vesternet.com/resources/technology-ind 。..
sudo nano /opt/openhab/configurations/openhab.cfg
查找標(biāo)題為 Z-Wave Binding”的部分。
您只需激活2個(gè)屬性(通過(guò)刪除前面的#)即可。
zwave:port 是Z-Wave控制器的端口。如果您有raZberry,則為/dev/ttyAMA0 。 USB記憶棒將為/dev/ttyUSB0 。
zwave:healtime 是每天進(jìn)行網(wǎng)絡(luò)修復(fù)的時(shí)間。您可能可以將其保留為2(2AM)。
cd /opt/openhab sudo wget sudo unzip habmin.zip sudo rm habmin.zip
將您的z波設(shè)備添加到網(wǎng)絡(luò)中,然后根據(jù)需要進(jìn)行關(guān)聯(lián)。
http://192.168.2.100:8080/habmin/(您的IP)
[查看圖片]
示例項(xiàng)目
調(diào)光器test_dimmer2“調(diào)光器2 [%d %%]”(zwave){zwave =“ 11”}
聯(lián)系Door_Switch“門(mén)傳感器[%s]”(zwave){zwave =“ 10: command = switch_binary,respond_to_basic = true“}聯(lián)系Door_Alarm”門(mén)防拆[%s]“(zwave){zwave =” 10:command = alarm“}
Number Door_Battery”門(mén)電池[%d %%]“”(zwave ){zwave =“ 10:command = battery”}
******* openHAB設(shè)置您的第一個(gè)站點(diǎn)*********
轉(zhuǎn)到打開(kāi)openHAB Wiki并閱讀。
摘要:
項(xiàng)-是家庭自動(dòng)化網(wǎng)絡(luò)中每個(gè)節(jié)點(diǎn)的列表。向網(wǎng)絡(luò)添加內(nèi)容時(shí),從此處開(kāi)始。
持久性-允許您記錄輸入。規(guī)則-通常是一個(gè)(如果是-然后是那個(gè))真正使您回家自動(dòng)化的規(guī)則。
腳本-我不使用這些
站點(diǎn)地圖-這是您通過(guò)web訪問(wèn)openHAB的主頁(yè)。您可以有多個(gè)。
Transform-允許您將每個(gè)節(jié)點(diǎn)提供的文本更改為您的首選項(xiàng)。
讓我們?cè)O(shè)置zwave調(diào)光器(下面引用的文件附在這篇文章中)
確認(rèn)在openhab.cfg文件中啟用了zwave綁定。我們之前做了這個(gè)。
確認(rèn)已安裝zwave附加組件。我們做了耳環(huán)。
\\ YOURPI \ OpenHAB \ addons \ org.openhab.binding.zwave-1.7.1
將新節(jié)點(diǎn)與zstick關(guān)聯(lián)。說(shuō)明在這里。
從openHAB管理界面(habmin)獲取節(jié)點(diǎn)信息。這是較早安裝的。
http://XXX.XXX.XXX.XXX:8080/habmin/(在您的pi上)
您可能需要基于以下內(nèi)容分配“關(guān)聯(lián)組”和“配置參數(shù)”在您的節(jié)點(diǎn)上。調(diào)光器通常不需要這樣做。
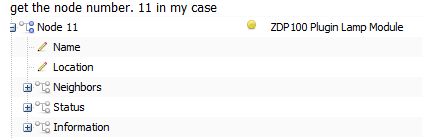
獲取節(jié)點(diǎn)號(hào)。在我的情況下11個(gè)
[請(qǐng)參見(jiàn)圖片]
對(duì)項(xiàng)目列表中的節(jié)點(diǎn)進(jìn)行編碼
\ OpenHAB \ configurations \ items \ HAB.items(我正在命名此HAB。隨著我們的前進(jìn),您會(huì)看到。)
將以下行添加到openhab
Dimmer light_living_dimmer “Living Rm Dimmer [%d %%]” (all,zwave,lights) { zwave= “11” }
Dimmer-是節(jié)點(diǎn)類(lèi)型
light_living_dimmer-是節(jié)點(diǎn)的名稱(chēng)。我按類(lèi)型命名所有項(xiàng)-位置-特異性
“ Living Rm Dimmer [%d %%]”-是出現(xiàn)在GUI(瀏覽器或應(yīng)用程序)中的名稱(chēng)和值
滑塊-是圖標(biāo)。在這種情況下,幻燈片可讓您通過(guò)GUI
(所有,zwave,燈光)調(diào)整亮度-這些是組。它們有助于在站點(diǎn)地圖上顯示多個(gè)項(xiàng)目(通過(guò)組)。它們還有助于一次將規(guī)則應(yīng)用于多個(gè)項(xiàng)目。
這些組也必須在Dimmer行下的openhab HAB.items中列出
Group all
Group zwave
Group lights
{zwave =“ 11”}-告訴openHAB它與zwave節(jié)點(diǎn)11接口。
將該項(xiàng)目添加到您的站點(diǎn)地圖中
\ OpenHAB \ configurations \ sitemaps \ HAB.sitemap
將以下幾行添加到站點(diǎn)地圖中
sitemap HAB label=“My openHAB”
{ Frame label= “Switches” icon= “l(fā)ight_switch” { Group item= lights label=“Lights” icon=“l(fā)ight_switch”
}
}
在這種情況下,“燈光”組中的所有項(xiàng)目都將顯示在這個(gè)框架中。您也可以單獨(dú)添加項(xiàng)目。
讓我們?cè)O(shè)置一個(gè)基于簡(jiǎn)單cron(時(shí)間)的規(guī)則
\ OpenHAB \ configurations \ rules \ HAB.rules
我使用http://www.cronmaker。 com/來(lái)延長(zhǎng)計(jì)劃時(shí)間
繼續(xù)并添加一些庫(kù)和規(guī)則。
import org.openhab.core.library.types.*
import org.openhab.core.persistence.*
import org.openhab.model.script.actions.*
import java.lang.Math
import org.openhab.core.library.types.DecimalType rule “Trigger Turn Light up to 75% at 1900”
when
Time cron “0 0 19 1/1 * ? *”
then
sendCommand(light_living_dimmer , 75)
}
end rule “Trigger Turn Light off at 2200”
when
Time cron “0 0 22 1/1 * ? *”
then
sendCommand(light_living_dimmer , 0)
}
end
僅此而已。玩得開(kāi)心!
步驟4:Raspbian可選USB音頻

我無(wú)法使用openHAB通過(guò)USB運(yùn)行音頻。如果可行,請(qǐng)?jiān)谠u(píng)論中發(fā)布解決方案。
Syba USB 2.0外部虛擬7.1環(huán)繞聲卡適配器
我可以讓Pi與USB音頻配合使用。對(duì)于openHAB來(lái)說(shuō),這將是無(wú)效的。可能是Java問(wèn)題?
弄清楚您的芯片組
首先要使Raspi 關(guān)閉/關(guān)閉(執(zhí)行干凈操作)。關(guān)閉!),然后插入U(xiǎn)SB聲卡。
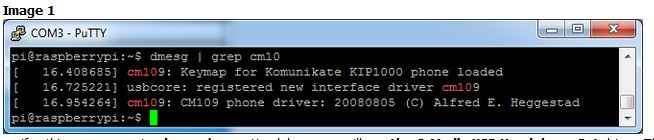
登錄后,鍵入 dmesg |。 grep cm109 查看啟動(dòng)消息。如果您使用的是 CM109 芯片組
圖像1
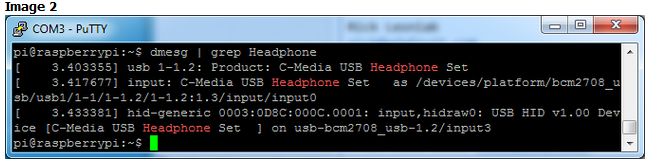
,則應(yīng)該看到關(guān)于 cm109 的幾行,或者如果什么都沒(méi)有出現(xiàn),嘗試 dmesg | grep 耳機(jī),您將看到 C-Media USB耳機(jī)設(shè)置驅(qū)動(dòng)程序。這表示其為 CM耳機(jī)
圖片2
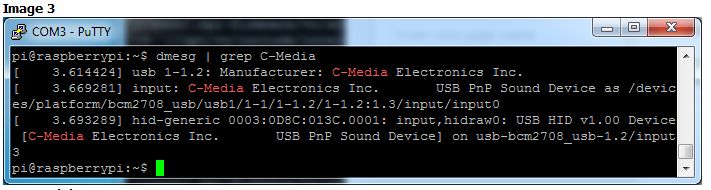
,或者如果未顯示任何內(nèi)容,請(qǐng)嘗試 dmesg | grep C-Media ,您會(huì)看到一些C-Media注釋?zhuān)珱](méi)有提及cm109驅(qū)動(dòng)程序。這表示其 CM108
圖像3
CM耳機(jī)類(lèi)型
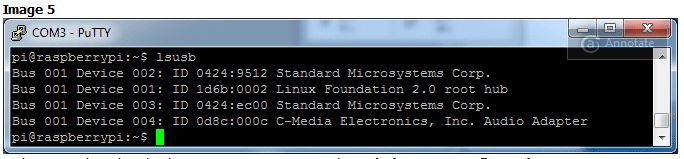
類(lèi)型 dmesg 查看啟動(dòng)消息。您應(yīng)該會(huì)看到許多關(guān)于 C媒體USB耳機(jī)套件
圖片4
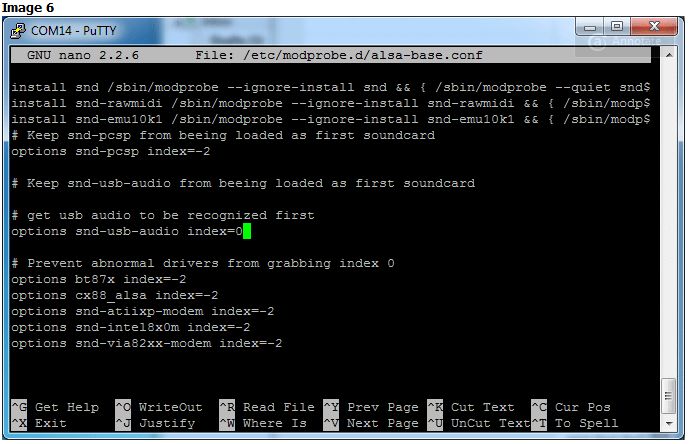
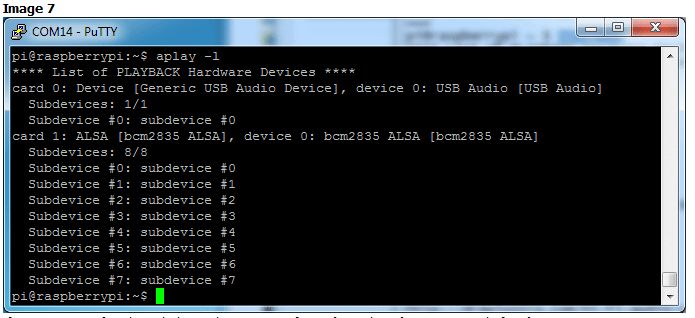
的信息,如果您鍵入 lsusb ,您應(yīng)該會(huì)看到對(duì) C-Media Electronics音頻適配器的引用,但沒(méi)有提及 CM108 ,并且VID/PID為0x0d8c:0x00c
Image 5
沒(méi)什么特別的事情要做!歡呼!繼續(xù)進(jìn)入“更新ALSA配置”部分
更新alsa選項(xiàng)
先備份
sudo cp /etc/modprobe.d/alsa-base.conf /etc/modprobe.d/alsa-base-1.conf
我們將進(jìn)行編輯帶有
sudo nano /etc/modprobe.d/alsa-base.conf
的音頻系統(tǒng)配置文件,但除了最新的Raspbian版本外,請(qǐng)查找以下內(nèi)容:
#options snd-usb-audio index=0
將其更改為:
options snd-usb-audio index=0
注意,我們?cè)谛械拈_(kāi)頭刪除了#。
對(duì)于最新的Raspbian版本,請(qǐng)查找以下行:
options snd-usb-audio index=-2
在這種情況下沒(méi)有要?jiǎng)h除的#號(hào),只需將索引從-2更改為0:
options snd-usb-audio index=0
圖像6
就是這樣!現(xiàn)在,使用 sudo reboot 重新啟動(dòng)并再次登錄,您可以通過(guò)runnig使用揚(yáng)聲器測(cè)試進(jìn)行測(cè)試
speaker-test -c2 -D hw:0,0
這會(huì)產(chǎn)生白噪聲通過(guò)聲卡上的左右“揚(yáng)聲器”。發(fā)出聲音后,請(qǐng)嘗試播放帶有音頻的音頻文件(對(duì)于WAV文件,不是MP3)
aplay /usr/share/scratch/Media/Sounds/Animal/Bird.wav aplay /usr/share/sounds/alsa/Front_Center.wav
如果要播放音樂(lè),您可以嘗試
sudo apt-get install mpg123 mpg123 http://voxsc1.somafm.com:8882
如果您想按命令播放MP3,請(qǐng)查看本教程,其中涵蓋了如何進(jìn)行設(shè)置
耳機(jī)vs音頻卡
別忘了,您在Pi上仍然擁有內(nèi)置的耳機(jī)插孔,現(xiàn)在稱(chēng)為卡1 (不是默認(rèn)的卡0 )
圖片7
如果您想再次通過(guò)該插孔玩游戲,請(qǐng)用-指定卡1 D hw:1,0 代替 -D hw:0,0
speaker-test -c2 -D hw:1,0
責(zé)任編輯:wv
-
Zwave
+關(guān)注
關(guān)注
0文章
8瀏覽量
12139 -
raspbian
+關(guān)注
關(guān)注
0文章
17瀏覽量
4284
發(fā)布評(píng)論請(qǐng)先 登錄
相關(guān)推薦
ADS62PxxEVM快速入門(mén)指南

BQ78412EVM板快速入門(mén)指南
TVP5154EVM快速入門(mén)指南
TAS3103EVM入門(mén)指南
TVP5150A:快速入門(mén)指南
TVP5160 EVM快速入門(mén)指南
傳感器設(shè)計(jì)工具入門(mén)和故障排除指南
DLPLCRC964評(píng)估模塊快速入門(mén)指南
BQ27546-G1入門(mén)指南
DRV2624和DRV2625快速入門(mén)指南
BQ產(chǎn)品入門(mén)指南
PGA460-Q1 EVM快速入門(mén)指南
AM263Px控制卡快速入門(mén)指南


 工商網(wǎng)監(jiān)
評(píng)論