") 如何在環(huán)境安裝使用Python操作word
如何在環(huán)境安裝使用Python操作word
作者丨超級(jí)大洋蔥806
https://tangxing.blog.csdn.net/article/details/108418066
環(huán)境安裝使用Python操作word大部分情況都是寫操作,也有少許情況會(huì)用到讀操作,在本次教程中都會(huì)進(jìn)行講解,本次課程主要用到以下4個(gè)庫(kù),請(qǐng)大家提前安裝。
python -m pip install -U pip setuptools
python-docx(我們大部分操作都是使用此庫(kù))
安裝方法:
pip install python-docx
使用方法:
from docx import Document
from docx.shared import Inches
官方文檔:
https://python-docx.readthedocs.io/en/latest/index.html
win32com(主要用作doc轉(zhuǎn)docx格式轉(zhuǎn)換用)
安裝方法:
pip install pypiwin32
使用方法:
import win32com
from win32com.client import Dispatch, constants
官方文檔:
https://docs.microsoft.com/en-us/dotnet/api/microsoft.office.interop.word?view=word-pia
mailmerge(用作按照模板生成大量同類型文檔)
安裝方法:
pip install docx-mailmerge
使用方法:
from mailmerge import MailMerge
官方文檔:
https://pypi.org/project/docx-mailmerge/
matplotlib(Python 的繪圖庫(kù),本期簡(jiǎn)單講解,后期會(huì)有專門的課程)
安裝方法:
pip install matplotlib
使用方法:
import matplotlib.pyplot as plt
官方文檔:
https://matplotlib.org/3.2.2/tutorials/introductory/sample_plots.html
Python-docx 新建文檔示例代碼1:
from docx import Document
document = Document()
document.save(‘new.docx’)
示例代碼 0.1 Python-docx新建文檔.py:
from docx import Document
def GenerateNewWord(filename):
document = Document()
document.save(filename)
if __name__ == “__main__”:
print(“大家好!我們今天開始學(xué)習(xí)word文檔自動(dòng)化”)
print(“我們先來直接生成一個(gè)名為‘new.docx’的文檔”)
document = Document()
document.save(‘new.docx’)
print(“沒錯(cuò),里面什么都沒有”)
# 我是華麗的分隔符
print(“我們使用函數(shù)生成一個(gè)word文檔試試”)
newname = ‘使用函數(shù)生成的文檔.docx’
GenerateNewWord(newname)
Python-docx 編輯已存在文檔我們很多時(shí)候需要在已存在的word文檔上添加自己的內(nèi)容,那么我們趕緊看看應(yīng)該怎樣操作吧~
舊文檔:
示例代碼:
from docx import Document
document = Document(‘exist.docx’)
document.save(‘new.docx’)
也許你會(huì)說,沒有沒搞錯(cuò),就這三句話?是的,就這三句,你就完成了舊文檔的復(fù)制,如果你想修改,直接添加內(nèi)容就行了呢!
win32com 將 doc 轉(zhuǎn)為 docx舊文檔:
示例代碼:
import os
from win32com import client as wc
def TransDocToDocx(oldDocName,newDocxName):
print(“我是 TransDocToDocx 函數(shù)”)
# 打開word應(yīng)用程序
word = wc.Dispatch(‘Word.Application’)
# 打開 舊word 文件
doc = word.Documents.Open(oldDocName)
# 保存為 新word 文件,其中參數(shù) 12 表示的是docx文件
doc.SaveAs(newDocxName, 12)
# 關(guān)閉word文檔
doc.Close()
word.Quit()
print(“生成完畢!”)
if __name__ == “__main__”:
# 獲取當(dāng)前目錄完整路徑
currentPath = os.getcwd()
print(“當(dāng)前路徑為:”,currentPath)
# 獲取 舊doc格式word文件絕對(duì)路徑名
docName = os.path.join(currentPath,‘舊doc格式文檔.doc’)
print(“docFilePath = ”, docName)
# 設(shè)置新docx格式文檔文件名
docxName = os.path.join(currentPath,‘新生成docx格式文檔.docx’)
TransDocToDocx(docName,docxName)
win32com 操作 word打開新的word文檔并添加內(nèi)容
示例代碼:
import win32com
from win32com.client import Dispatch, constants
import os
# 創(chuàng)建新的word文檔def funOpenNewFile():
word = Dispatch(‘Word.Application’)
# 或者使用下面的方法,使用啟動(dòng)獨(dú)立的進(jìn)程:
# word = DispatchEx(‘Word.Application’)
# 如果不聲明以下屬性,運(yùn)行的時(shí)候會(huì)顯示的打開word
word.Visible = 1 # 0:后臺(tái)運(yùn)行 1:前臺(tái)運(yùn)行(可見)
word.DisplayAlerts = 0 # 不顯示,不警告
# 創(chuàng)建新的word文檔
doc = word.Documents.Add()
# 在文檔開頭添加內(nèi)容
myRange1 = doc.Range(0, 0)
myRange1.InsertBefore(‘Hello word
’)
# 在文檔末尾添加內(nèi)容
myRange2 = doc.Range()
myRange2.InsertAfter(‘Bye word
’)
# 在文檔i指定位置添加內(nèi)容
i = 0
myRange3 = doc.Range(0, i)
myRange3.InsertAfter(“what‘s up, bro?
”)
# doc.Save() # 保存
doc.SaveAs(os.getcwd() + “\funOpenNewFile.docx”) # 另存為
doc.Close() # 關(guān)閉 word 文檔
word.Quit() # 關(guān)閉 officeif __name__ == ’__main__‘:
print(“當(dāng)前文件路徑名:”,os.getcwd())
print(“調(diào)用funOpenNewFile()”)
funOpenNewFile()
打開已存在word文檔并添加內(nèi)容
前提條件:
示例代碼:
import win32com
from win32com.client import Dispatch, constants
import os
# 打開已存在的word文件def funOpenExistFile():
word = Dispatch(’Word.Application‘)
# 或者使用下面的方法,使用啟動(dòng)獨(dú)立的進(jìn)程:
# word = DispatchEx(’Word.Application‘)
# 如果不聲明以下屬性,運(yùn)行的時(shí)候會(huì)顯示的打開word
word.Visible = 1 # 0:后臺(tái)運(yùn)行 1:前臺(tái)運(yùn)行(可見)
word.DisplayAlerts = 0 # 不顯示,不警告
doc = word.Documents.Open(os.getcwd() + “\3.1 win32com測(cè)試.docx”) # 打開一個(gè)已有的word文檔
# 在文檔開頭添加內(nèi)容
myRange1 = doc.Range(0, 0)
myRange1.InsertBefore(’Hello word
‘)
# 在文檔末尾添加內(nèi)容
myRange2 = doc.Range()
myRange2.InsertAfter(’Bye word
‘)
# 在文檔i指定位置添加內(nèi)容
i = 0
myRange3 = doc.Range(0, i)
myRange3.InsertAfter(“what’s up, bro?
”)
# doc.Save() # 保存
doc.SaveAs(os.getcwd() + “\funOpenExistFile.docx”) # 另存為
doc.Close() # 關(guān)閉 word 文檔
word.Quit() # 關(guān)閉 officeif __name__ == ‘__main__’:
print(“當(dāng)前文件路徑名:”,os.getcwd())
print(“調(diào)用funOpenExistFile()”)
funOpenExistFile()
轉(zhuǎn)換word為pdf
示例代碼:
import win32com
from win32com.client import Dispatch, constants
import os
# 生成Pdf文件def funGeneratePDF():
word = Dispatch(“Word.Application”)
word.Visible = 0 # 后臺(tái)運(yùn)行,不顯示
word.DisplayAlerts = 0 # 不警告
doc = word.Documents.Open(os.getcwd() + “\3.3 win32com轉(zhuǎn)換word為pdf等格式.docx”) # 打開一個(gè)已有的word文檔
doc.SaveAs(os.getcwd() + “\3.3 win32com轉(zhuǎn)換word為pdf等格式.pdf”, 17) # txt=4, html=10, docx=16, pdf=17
doc.Close()
word.Quit()
if __name__ == ‘__main__’:
funGeneratePDF()
Python-docx 操作 word官方文檔:(最權(quán)威指南,沒有之一)
https://python-docx.readthedocs.io/en/latest/
Python-docx官方例程
前提條件:
示例代碼:
from docx import Document
from docx.shared import Inches
document = Document()
document.add_heading(‘Document Title’, 0)
p = document.add_paragraph(‘A plain paragraph having some ’)
p.add_run(‘bold’).bold = True
p.add_run(‘ and some ’)
p.add_run(‘italic.’).italic = True
document.add_heading(‘Heading, level 1’, level=1)
document.add_paragraph(‘Intense quote’, style=‘Intense Quote’)
document.add_paragraph(
‘first item in unordered list’, style=‘List Bullet’
)
document.add_paragraph(
‘first item in ordered list’, style=‘List Number’
)
document.add_picture(‘countrygarden.png’, width=Inches(1.25))
records = (
(3, ‘101’, ‘Spam’),
(7, ‘422’, ‘Eggs’),
(4, ‘631’, ‘Spam, spam, eggs, and spam’)
)
table = document.add_table(rows=1, cols=3)
hdr_cells = table.rows[0].cells
hdr_cells[0].text = ‘Qty’
hdr_cells[1].text = ‘Id’
hdr_cells[2].text = ‘Desc’for qty, id, desc in records:
row_cells = table.add_row().cells
row_cells[0].text = str(qty)
row_cells[1].text = id
row_cells[2].text = desc
document.add_page_break()
document.save(‘4.1 Python-docx官方例程.docx’)
最終效果:
Python-docx官方例程解析
導(dǎo)入庫(kù)操作
from docx import Document
導(dǎo)入英寸單位操作(可用于指定圖片大小、表格寬高等)
from docx.shared import Inches
新建一個(gè)文檔
document = Document()
加載舊文檔(用于修改或添加內(nèi)容)
document = Document(‘exist.docx’)
添加標(biāo)題段落
document.add_heading(‘Document Title’, 0)

添加段落操作
段落在 Word 中是基本內(nèi)容。它們用于正文文本,也用于標(biāo)題和項(xiàng)目列表(如項(xiàng)目符號(hào))。
p = document.add_paragraph(‘A plain paragraph having some ’)
在指定段落上添加內(nèi)容
p.add_run(‘bold’).bold = True # 添加粗體文字
p.add_run(‘ and some ’) # 添加默認(rèn)格式文字
p.add_run(‘italic.’).italic = True # 添加斜體文字
添加標(biāo)題操作
等級(jí)1-9 也就是標(biāo)題1-標(biāo)題9,我們可以在舊文檔中將標(biāo)題格式設(shè)置好,使用Python-docx打開舊文檔,再添加相應(yīng)等級(jí)標(biāo)題即可。
document.add_heading(‘Heading, level 1’, level=1)
添加指定樣式段落
樣式詳情:
https://python-docx.readthedocs.io/en/latest/user/styles-understanding.html#understanding-styles
document.add_paragraph(‘Intense quote’, style=‘Intense Quote’)
# 以下兩句的含義等同于上面一句
p = document.add_paragraph(‘Intense quote’)
p.style = ‘Intense Quote’
添加無(wú)序列表操作
document.add_paragraph( ‘first item in unordered list’, style=‘List Bullet’)
添加有序列表操作
document.add_paragraph( ‘first item in ordered list’, style=‘List Number’)

添加圖片操作
第一個(gè)參數(shù)為圖片路徑,需要正確無(wú)誤
第二個(gè)參數(shù)為圖片大小,單位英寸
document.add_picture(‘countrygarden.png’, width=Inches(1.25))
新建表格操作
table = document.add_table(rows=1, cols=3)
填充標(biāo)題行操作
hdr_cells = table.rows[0].cells
hdr_cells[0].text = ‘Qty’
hdr_cells[1].text = ‘Id’
hdr_cells[2].text = ‘Desc’
為每組內(nèi)容添加數(shù)據(jù)行并填充
for qty, id, desc in records:
row_cells = table.add_row().cells
row_cells[0].text = str(qty)
row_cells[1].text = id
row_cells[2].text = desc
設(shè)置標(biāo)題樣式操作
table.style = ‘LightShading-Accent1’

添加分頁(yè)符操作
document.add_page_break()
保存當(dāng)前文檔操作
document.save(‘4.1 Python-docx官方例程.docx’)
Python-docx 表格樣式設(shè)置
表格樣式設(shè)置代碼:
from docx import *
document = Document()
table = document.add_table(3, 3, style=“Medium Grid 1 Accent 1”)
heading_cells = table.rows[0].cells
heading_cells[0].text = ‘第一列內(nèi)容’
heading_cells[1].text = ‘第二列內(nèi)容’
heading_cells[2].text = ‘第三列內(nèi)容’
document.save(“demo.docx”)
遍歷所有樣式:
from docx.enum.style import WD_STYLE_TYPE
from docx import Document
document = Document()
styles = document.styles
# 生成所有表樣式for s in styles:
if s.type == WD_STYLE_TYPE.TABLE:
document.add_paragraph(“表格樣式 : ” + s.name)
table = document.add_table(3, 3, style=s)
heading_cells = table.rows[0].cells
heading_cells[0].text = ‘第一列內(nèi)容’
heading_cells[1].text = ‘第二列內(nèi)容’
heading_cells[2].text = ‘第三列內(nèi)容’
document.add_paragraph(“
”)
document.save(‘4.3 所有表格樣式.docx’)
效果如下(大家按照喜歡的樣式添加即可):
docx&matplotlib 自動(dòng)生成數(shù)據(jù)分析報(bào)告最終效果
數(shù)據(jù)獲取
我們這里使用xlrd作為數(shù)據(jù)獲取所使用的庫(kù),簡(jiǎn)單回顧一下:
import xlrd
xlsx = xlrd.open_workbook(‘。/3_1 xlrd 讀取 操作練習(xí).xlsx’)
# 通過sheet名查找:xlsx.sheet_by_name(“sheet1”)# 通過索引查找:xlsx.sheet_by_index(3)
table = xlsx.sheet_by_index(0)
# 獲取單個(gè)表格值 (2,1)表示獲取第3行第2列單元格的值
value = table.cell_value(2, 1)
print(“第3行2列值為”,value)
# 獲取表格行數(shù)
nrows = table.nrows
print(“表格一共有”,nrows,“行”)
# 獲取第4列所有值(列表生成式)
name_list = [str(table.cell_value(i, 3)) for i in range(1, nrows)]
print(“第4列所有的值:”,name_list)
表格內(nèi)容:
編寫數(shù)據(jù)獲取代碼:
我們這里只獲取用戶姓名和,分?jǐn)?shù),并將它們保存到列表中,看代碼。
# 獲取學(xué)習(xí)成績(jī)信息def GetExcelInfo():
print(“開始獲取表格內(nèi)容信息”)
# 打開指定文檔
xlsx = xlrd.open_workbook(‘學(xué)生成績(jī)表格.xlsx’)
# 獲取sheet
sheet = xlsx.sheet_by_index(0)
# 獲取表格行數(shù)
nrows = sheet.nrows
print(“一共 ”,nrows,“ 行數(shù)據(jù)”)
# 獲取第2列,和第4列 所有值(列表生成式),從第2行開始獲取
nameList = [str(sheet.cell_value(i, 1)) for i in range(1, nrows)]
scoreList = [int(sheet.cell_value(i, 3)) for i in range(1, nrows)]
# 返回名字列表和分?jǐn)?shù)列表
return nameList,scoreList
獲取結(jié)果:

柱狀圖生成
我們先將獲取的姓名和成績(jī)使用 字典 數(shù)據(jù)結(jié)構(gòu)關(guān)聯(lián)起來,再對(duì)其排序:
# 將名字和分?jǐn)?shù)列表合并成字典(將學(xué)生姓名和分?jǐn)?shù)關(guān)聯(lián)起來)
scoreDictionary = dict(zip(nameList, scoreList))
print(“dictionary:”,scoreDictionary)
# 對(duì)字典進(jìn)行值排序,高分在前,reverse=True 代表降序排列
scoreOrder = sorted(scoreDictionary.items(), key=lambda x: x[1], reverse=True)
print(“scoreOrder”,scoreOrder)
# 合成的字典
dictionary: {‘Dillon Miller’: 41, ‘Laura Robinson’: 48, ‘Gabrilla Rogers’: 28, ‘Carlos Chen’: 54, ‘Leonard Humphrey’: 44, ‘John Hall’: 63, ‘Miranda Nelson’: 74, ‘Jessica Morgan’: 34, ‘April Lawrence’: 67, ‘Cindy Brown’: 52, ‘Cassandra Fernan’: 29, ‘April Crawford’: 91, ‘Jennifer Arias’: 61, ‘Philip Walsh’: 58, ‘Christina Hill P’: 14, ‘Justin Dunlap’: 56, ‘Brian Lynch’: 84, ‘Michael Brown’: 68}
# 排序后,再次轉(zhuǎn)換成列表
scoreOrder [(‘April Crawford’, 91), (‘Brian Lynch’, 84), (‘Miranda Nelson’, 74), (‘Michael Brown’, 68), (‘April Lawrence’, 67), (‘John Hall’, 63), (‘Jennifer Arias’, 61), (‘Philip Walsh’, 58), (‘Justin Dunlap’, 56), (‘Carlos Chen’, 54), (‘Cindy Brown’, 52), (‘Laura Robinson’, 48), (‘Leonard Humphrey’, 44), (‘Dillon Miller’, 41), (‘Jessica Morgan’, 34), (‘Cassandra Fernan’, 29), (‘Gabrilla Rogers’, 28), (‘Christina Hill P’, 14)]
使用 matplotlib 生成柱狀圖:
# 生成學(xué)生成績(jī)柱狀圖(使用matplotlib)# 會(huì)生成一張名為“studentScore.jpg”的圖片def GenerateScorePic(scoreList):
# 解析成績(jī)列表,生成橫縱坐標(biāo)列表
xNameList = [str(studentInfo[0]) for studentInfo in scoreList]
yScoreList = [int(studentInfo[1]) for studentInfo in scoreList]
print(“xNameList”,xNameList)
print(“yScoreList”,yScoreList)
# 設(shè)置字體格式
matplotlib.rcParams[‘font.sans-serif’] = [‘SimHei’] # 用黑體顯示中文
# 設(shè)置繪圖尺寸
plt.figure(figsize=(10,5))
# 繪制圖像
plt.bar(x=xNameList, height=yScoreList, label=‘學(xué)生成績(jī)’, color=‘steelblue’, alpha=0.8)
# 在柱狀圖上顯示具體數(shù)值, ha參數(shù)控制水平對(duì)齊方式, va控制垂直對(duì)齊方式
for x1, yy in scoreList:
plt.text(x1, yy + 1, str(yy), ha=‘center’, va=‘bottom’, fontsize=16, rotation=0)
# 設(shè)置標(biāo)題
plt.title(“學(xué)生成績(jī)柱狀圖”)
# 為兩條坐標(biāo)軸設(shè)置名稱
plt.xlabel(“學(xué)生姓名”)
plt.ylabel(“學(xué)生成績(jī)”)
# 顯示圖例
plt.legend()
# 坐標(biāo)軸旋轉(zhuǎn)
plt.xticks(rotation=90)
# 設(shè)置底部比例,防止橫坐標(biāo)顯示不全
plt.gcf().subplots_adjust(bottom=0.25)
# 保存為圖片
plt.savefig(“studentScore.jpg”)
# 直接顯示
plt.show()
生成最終報(bào)告
代碼如下:
# 開始生成報(bào)告def GenerateScoreReport(scoreOrder,picPath):
# 新建一個(gè)文檔
document = Document()
# 設(shè)置標(biāo)題
document.add_heading(‘?dāng)?shù)據(jù)分析報(bào)告’, 0)
# 添加第一名的信息
p1 = document.add_paragraph(“分?jǐn)?shù)排在第一的學(xué)生姓名為: ”)
p1.add_run(scoreOrder[0][0]).bold = True
p1.add_run(“ 分?jǐn)?shù)為: ”)
p1.add_run(str(scoreOrder[0][1])).italic = True
# 添加總體情況信息
p2 = document.add_paragraph(“共有: ”)
p2.add_run(str(len(scoreOrder))).bold = True
p2.add_run(“ 名學(xué)生參加了考試,學(xué)生考試的總體情況: ”)
# 添加考試情況表格
table = document.add_table(rows=1, cols=2)
table.style = ‘Medium Grid 1 Accent 1’
hdr_cells = table.rows[0].cells
hdr_cells[0].text = ‘學(xué)生姓名’
hdr_cells[1].text = ‘學(xué)生分?jǐn)?shù)’
for studentName,studentScore in scoreOrder:
row_cells = table.add_row().cells
row_cells[0].text = studentName
row_cells[1].text = str(studentScore)
# 添加學(xué)生成績(jī)柱狀圖
document.add_picture(picPath, width=Inches(6))
document.save(‘學(xué)生成績(jī)報(bào)告.docx’)
完整代碼
import xlrd
import matplotlib
import matplotlib.pyplot as plt
from docx import Document
from docx.shared import Inches
# 獲取學(xué)習(xí)成績(jī)信息def GetExcelInfo():
print(“開始獲取表格內(nèi)容信息”)
# 打開指定文檔
xlsx = xlrd.open_workbook(‘學(xué)生成績(jī)表格.xlsx’)
# 獲取sheet
sheet = xlsx.sheet_by_index(0)
# 獲取表格行數(shù)
nrows = sheet.nrows
print(“一共 ”,nrows,“ 行數(shù)據(jù)”)
# 獲取第2列,和第4列 所有值(列表生成式),從第2行開始獲取
nameList = [str(sheet.cell_value(i, 1)) for i in range(1, nrows)]
scoreList = [int(sheet.cell_value(i, 3)) for i in range(1, nrows)]
# 返回名字列表和分?jǐn)?shù)列表
return nameList,scoreList
# 生成學(xué)生成績(jī)柱狀圖(使用matplotlib)# 會(huì)生成一張名為“studentScore.jpg”的圖片def GenerateScorePic(scoreList):
# 解析成績(jī)列表,生成橫縱坐標(biāo)列表
xNameList = [str(studentInfo[0]) for studentInfo in scoreList]
yScoreList = [int(studentInfo[1]) for studentInfo in scoreList]
print(“xNameList”,xNameList)
print(“yScoreList”,yScoreList)
# 設(shè)置字體格式
matplotlib.rcParams[‘font.sans-serif’] = [‘SimHei’] # 用黑體顯示中文
# 設(shè)置繪圖尺寸
plt.figure(figsize=(10,5))
# 繪制圖像
plt.bar(x=xNameList, height=yScoreList, label=‘學(xué)生成績(jī)’, color=‘steelblue’, alpha=0.8)
# 在柱狀圖上顯示具體數(shù)值, ha參數(shù)控制水平對(duì)齊方式, va控制垂直對(duì)齊方式
for x1, yy in scoreList:
plt.text(x1, yy + 1, str(yy), ha=‘center’, va=‘bottom’, fontsize=16, rotation=0)
# 設(shè)置標(biāo)題
plt.title(“學(xué)生成績(jī)柱狀圖”)
# 為兩條坐標(biāo)軸設(shè)置名稱
plt.xlabel(“學(xué)生姓名”)
plt.ylabel(“學(xué)生成績(jī)”)
# 顯示圖例
plt.legend()
# 坐標(biāo)軸旋轉(zhuǎn)
plt.xticks(rotation=90)
# 設(shè)置底部比例,防止橫坐標(biāo)顯示不全
plt.gcf().subplots_adjust(bottom=0.25)
# 保存為圖片
plt.savefig(“studentScore.jpg”)
# 直接顯示
plt.show()
# 開始生成報(bào)告def GenerateScoreReport(scoreOrder,picPath):
# 新建一個(gè)文檔
document = Document()
# 設(shè)置標(biāo)題
document.add_heading(‘?dāng)?shù)據(jù)分析報(bào)告’, 0)
# 添加第一名的信息
p1 = document.add_paragraph(“分?jǐn)?shù)排在第一的學(xué)生姓名為: ”)
p1.add_run(scoreOrder[0][0]).bold = True
p1.add_run(“ 分?jǐn)?shù)為: ”)
p1.add_run(str(scoreOrder[0][1])).italic = True
# 添加總體情況信息
p2 = document.add_paragraph(“共有: ”)
p2.add_run(str(len(scoreOrder))).bold = True
p2.add_run(“ 名學(xué)生參加了考試,學(xué)生考試的總體情況: ”)
# 添加考試情況表格
table = document.add_table(rows=1, cols=2)
table.style = ‘Medium Grid 1 Accent 1’
hdr_cells = table.rows[0].cells
hdr_cells[0].text = ‘學(xué)生姓名’
hdr_cells[1].text = ‘學(xué)生分?jǐn)?shù)’
for studentName,studentScore in scoreOrder:
row_cells = table.add_row().cells
row_cells[0].text = studentName
row_cells[1].text = str(studentScore)
# 添加學(xué)生成績(jī)柱狀圖
document.add_picture(picPath, width=Inches(6))
document.save(‘學(xué)生成績(jī)報(bào)告.docx’)
if __name__ == “__main__”:
# 調(diào)用信息獲取方法,獲取用戶信息
nameList,scoreList = GetExcelInfo()
# print(“nameList:”,nameList)
# print(“ScoreList:”,scoreList)
# 將名字和分?jǐn)?shù)列表合并成字典(將學(xué)生姓名和分?jǐn)?shù)關(guān)聯(lián)起來)
scoreDictionary = dict(zip(nameList, scoreList))
# print(“dictionary:”,scoreDictionary)
# 對(duì)字典進(jìn)行值排序,高分在前,reverse=True 代表降序排列
scoreOrder = sorted(scoreDictionary.items(), key=lambda x: x[1], reverse=True)
# print(“scoreOrder”,scoreOrder)
# 將進(jìn)行排序后的學(xué)生成績(jī)列表生成柱狀圖
GenerateScorePic(scoreOrder)
# 開始生成報(bào)告
picPath = “studentScore.jpg”
GenerateScoreReport(scoreOrder,picPath)
print(“任務(wù)完成,報(bào)表生成完畢!”)
Python-docx 修改舊 word 文檔回顧:打開舊文檔,并另存為新文檔
我們這里就拿上一節(jié)生成的學(xué)生成績(jī)報(bào)告作為示例:
from docx import Document
if __name__ == “__main__”:
document = Document(‘6 學(xué)生成績(jī)報(bào)告.docx’)
# 在這里進(jìn)行操作,此處忽略
document.save(‘修改后的報(bào)告.docx’)
讀取word文檔的內(nèi)容
示例代碼:
from docx import Document
if __name__ == “__main__”:
document = Document(‘6 學(xué)生成績(jī)報(bào)告.docx’)
# 讀取 word 中所有內(nèi)容
for p in document.paragraphs:
print(“paragraphs:”,p.text)
# 讀取 word 中所有一級(jí)標(biāo)題
for p in document.paragraphs:
if p.style.name == ‘Heading 1’:
print(“Heading 1:”,p.text)
# 讀取 word 中所有二級(jí)標(biāo)題
for p in document.paragraphs:
if p.style.name == ‘Heading 2’:
print(“Heading 2:”, p.text)
# 讀取 word 中所有正文
for p in document.paragraphs:
if p.style.name == ‘Normal’:
print(“Normal:”, p.text)
document.save(‘修改后的報(bào)告.docx’)
讀取docx中表格內(nèi)
示例代碼:
from docx import Document
if __name__ == “__main__”:
document = Document(‘6 學(xué)生成績(jī)報(bào)告.docx’)
# 讀取表格內(nèi)容
for tb in document.tables:
for i,row in enumerate(tb.rows):
for j,cell in enumerate(row.cells):
text = ‘’
for p in cell.paragraphs:
text += p.text
print(f‘第{i}行,第{j}列的內(nèi)容{text}’)
document.save(‘修改后的報(bào)告.docx’)
修改word中的內(nèi)容
示例代碼:
from docx import Document
if __name__ == “__main__”:
document = Document(‘6 學(xué)生成績(jī)報(bào)告.docx’)
# 修改 word 中所有內(nèi)容
for p in document.paragraphs:
p.text = “修改后的段落內(nèi)容”
# 修改表格內(nèi)容
for tb in document.tables:
for i,row in enumerate(tb.rows):
for j,cell in enumerate(row.cells):
text = ‘’
for p in cell.paragraphs:
p.text = (“第”,str(i),“行”,str(j),“列”)
print(f‘第{i}行,第{j}列的內(nèi)容{text}’)
document.save(‘6.4 修改后的報(bào)告.docx’)
docx-mailmerge 自動(dòng)生成萬(wàn)份勞動(dòng)合同創(chuàng)建合同模板
添加內(nèi)容框架
創(chuàng)建一個(gè)域
設(shè)置域名
依次全部添加
生成1份證明
示例代碼:
from mailmerge import MailMerge
template = ‘薪資證明模板.docx’
document = MailMerge(template)
document.merge(name = ‘唐星’,
id = ‘1010101010’,
year = ‘2020’,
salary = ‘99999’,
document.write(‘生成的1份證明.docx’)
哈哈哈哈!!月入10萬(wàn),走向人生巔峰~
生成10000份證明
示例代碼:
from mailmerge import MailMerge
from datetime import datetime
# 生成單份合同def GenerateCertify(templateName,newName):
# 打開模板
document = MailMerge(templateName)
# 替換內(nèi)容
document.merge(name=‘唐星’,
id=‘1010101010’,
year=‘2020’,
salary=‘99999’,
job=‘嵌入式軟件開發(fā)工程師’)
# 保存文件
document.write(newName)
if __name__ == “__main__”:
templateName = ‘薪資證明模板.docx’
# 獲得開始時(shí)間
startTime = datetime.now()
# 開始生成
for i in range(10000):
newName = f‘。/10000份證明/薪資證明{i}.docx’
GenerateCertify(templateName,newName)
# 獲取結(jié)束時(shí)間
endTime = datetime.now()
# 計(jì)算時(shí)間差
allSeconds = (endTime - startTime).seconds
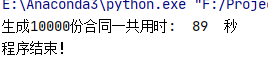
print(“生成10000份合同一共用時(shí): ”,str(allSeconds),“ 秒”)
print(“程序結(jié)束!”)
只花了89秒,平均不到 0.01 就能生成一個(gè)!!快
責(zé)任編輯:haq
-
自動(dòng)化
+關(guān)注
關(guān)注
29文章
5622瀏覽量
79663 -
python
+關(guān)注
關(guān)注
56文章
4807瀏覽量
85039
原文標(biāo)題:Python自動(dòng)化辦公之Word,全網(wǎng)最全看這一篇就夠了
文章出處:【微信號(hào):AndroidPush,微信公眾號(hào):Android編程精選】歡迎添加關(guān)注!文章轉(zhuǎn)載請(qǐng)注明出處。
發(fā)布評(píng)論請(qǐng)先 登錄
相關(guān)推薦
華為云 Flexus X 實(shí)例評(píng)測(cè)使用體驗(yàn)——Anaconda 環(huán)境安裝

使用Python實(shí)現(xiàn)xgboost教程
Flexus 云服務(wù)器 X:Python 安裝的極致便捷之旅

電腦是已經(jīng)安裝了python2.7,為什么打開GUI的script window時(shí),一直提示未找到python2.7?
Docker運(yùn)行環(huán)境安裝
pycharm配置pytorch運(yùn)行環(huán)境
pycharm怎么配置pytorch環(huán)境
用python寫驗(yàn)證環(huán)境cocotb


 工商網(wǎng)監(jiān)
評(píng)論