") 利用ROHM傳感器評(píng)估套件實(shí)現(xiàn)UCLA AirMouse–第2部分
利用ROHM傳感器評(píng)估套件實(shí)現(xiàn)UCLA AirMouse–第2部分
這篇文章來(lái)源于DevicePlus.com英語(yǔ)網(wǎng)站的翻譯稿。
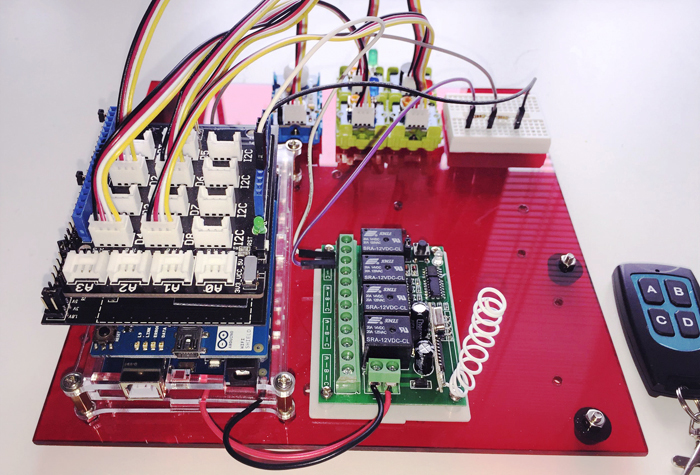
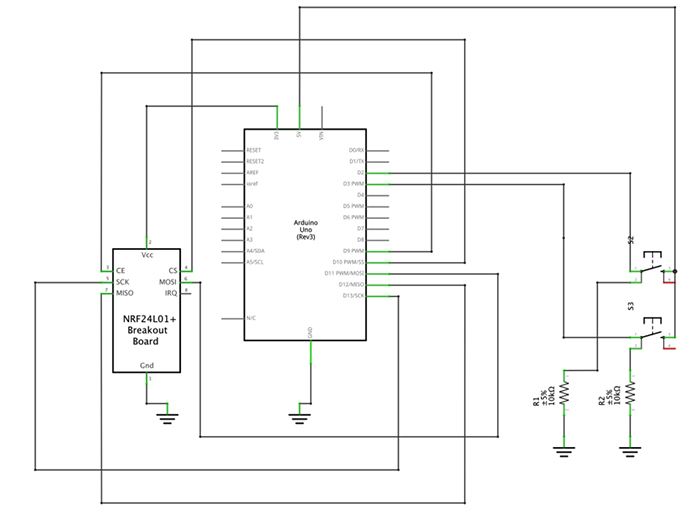
在利用ROHM傳感器評(píng)估套件實(shí)現(xiàn)UCLA AirMouse – 第1部分中,我們完成了項(xiàng)目的硬件。對(duì)于發(fā)射器部分,我們將AirMouse按鈕以及Uno的GPIO引腳和RF模塊之間的接口組裝在一塊面包板上。由于ROHM傳感器開(kāi)發(fā)板(SensorShield)在原型設(shè)計(jì)和DIY項(xiàng)目方面的應(yīng)用非常方便,因此我們選擇將其與加速度計(jì)模塊接合在一起使用。正如您將在本教程中看到的那樣,ROHM開(kāi)發(fā)板內(nèi)置Arduino與其外設(shè)之間的I2C通信功能,因此,用戶通過(guò)一些簡(jiǎn)單代碼就可以接收加速度計(jì)的數(shù)據(jù),無(wú)需編寫(xiě)任何底層I2C函數(shù)來(lái)發(fā)送和接收來(lái)自設(shè)備地址的數(shù)據(jù)。對(duì)于接收器部分,我們?yōu)?a href="http://www.qldv.cn/tags/te/" target="_blank">Teensy微控制器組裝了類似的分線板,以便與RF模塊對(duì)接。
本教程介紹和描述的代碼將幫您將兩個(gè)模塊連接在一起,以完成該項(xiàng)目。我們將向您展示兩個(gè)模塊之間發(fā)送數(shù)據(jù)的基本代碼以及處理加速度計(jì)數(shù)據(jù)以在計(jì)算機(jī)顯示器上移動(dòng)光標(biāo)的基本代碼。同時(shí),我們希望您能創(chuàng)造一些更酷的補(bǔ)充和改進(jìn)!
AirMouse快速概覽
我們都用過(guò)電腦鼠標(biāo),但是它們只能在桌面之類的平面上工作。我們已經(jīng)制作了一個(gè)“AirMouse”——一款能夠在3D空間中運(yùn)行的計(jì)算機(jī)鼠標(biāo)。用戶通過(guò)傾斜鼠標(biāo)就可以讓屏幕上的光標(biāo)移動(dòng),從而可以進(jìn)行大范圍自定義動(dòng)作。我們已經(jīng)在第1部分中介紹了構(gòu)建AirMouse的基礎(chǔ)知識(shí)。AirMouse主要由兩部分組成:戴在手上的鼠標(biāo)發(fā)射器和連接用戶計(jì)算機(jī)的接收器。發(fā)射器收集鼠標(biāo)的方向和按鈕狀態(tài)信息;而接收器則負(fù)責(zé)轉(zhuǎn)換這些信息,從而在計(jì)算機(jī)屏幕上執(zhí)行相應(yīng)操作。AirMouse由Arduino Uno和nRF24L01射頻模塊結(jié)合ROHM傳感器開(kāi)發(fā)板的加速度計(jì)構(gòu)建而成。
第1部分的硬件:
發(fā)射器:
● 1 x Arduino Uno微控制器
1 x ROHM傳感器評(píng)估套件
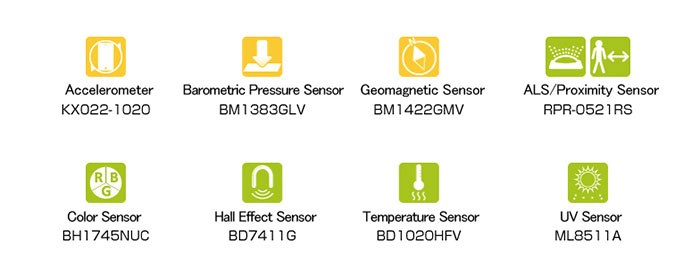
1 x ROHM加速度計(jì) (KX022-1020)
1 x nRF24L01+ RF模塊
滑動(dòng)開(kāi)關(guān)
1 x 可焊接試驗(yàn)電路板,足夠大,能焊接微控制器和所有電子器件
2 x 按鍵
1 x 1s LiPo電池
1 x 1k?電阻r
1 x 3.3k?電阻
接收器:
1 x Teensy 3.2微控制器
1 x NRF24L01+ RF模塊
排母
1 x 可焊接試驗(yàn)電路板,足夠大,能焊接微控制器和所有電子器件
1 x 紅、黃、綠LED燈
1 x 150?電阻
按照第1部分連接硬件之后,您就可以利用以下程序運(yùn)行發(fā)送器和接收器。
發(fā)射器:
#include
#include "RF24.h"

#define byte uint8_t
#include
#include

KX022 accelerometer(KX022_DEVICE_ADDRESS_1E);

RF24 radio(9,10);

uint64_t pipes[2] = {0xF0F0F0F0F0, 0xF0F1F1F1F1}; //reading, writing

void initRadio()
{
 radio.setPALevel(RF24_PA_HIGH);
 //payload size default 32...
 radio.setChannel(10); //you can change the channel setting
 radio.setCRCLength(RF24_CRC_16); //2-byte CRC
 radio.setDataRate(RF24_1MBPS); //1Mbps data rate

 radio.openReadingPipe(0, pipes[0]);
 radio.openWritingPipe(pipes[1]);
}

#define buttonPinR 2 //change these accordingly
#define buttonPinL 3

void setup() {
 // put your setup code here, to run once:
 Serial.begin(9600);
 while (!Serial);

 pinMode(buttonPinR, INPUT);
 pinMode(buttonPinL, INPUT);

 radio.begin();
 initRadio();
 radio.stopListening();

 Wire.begin();
 accelerometer.init();
}

long lastDebounceTimeR = 0;  // the last time the output pin was toggled
long lastDebounceTimeL = 0;
long debounceDelay = 50;
int buttonStateR = LOW;             // the current reading from the input pin
int buttonStateL = LOW;
int lastReadingR = LOW;
int lastReadingL = LOW;

char readButtonR(){
 int reading = digitalRead(buttonPinR);//get what state the button is
 char out = 'a';//the value to return if nothing special happened

 if (reading != lastReadingR) {//We're reading a new state for button
   // reset the debouncing timer
   lastDebounceTimeR = millis();
 }

 if ((millis() - lastDebounceTimeR) > debounceDelay) {//We finally have a stable value
   if (reading != buttonStateR)//Compared to our previous state, we have a flip
   {
     out = 'r';//prepare to toggle the Mini
   }
   buttonStateR = reading;//Make the buttonState the same
 }

 lastReadingR = reading;//make the last state the "current" state
 return out;
}

char readButtonL(){
 int reading = digitalRead(buttonPinL);
 char out = 'a';

 if (reading != lastReadingL) {
   // reset the debouncing timer
   lastDebounceTimeL = millis();
 }

 if ((millis() - lastDebounceTimeL) > debounceDelay) {

   if (reading != buttonStateL)
   {
     out = 'l';
   }
   buttonStateL = reading;
 }

 lastReadingL = reading;
 return out;
}

struct data
{
 boolean isPushedR = false;
 boolean isPushedL = false;
 int8_t acceleration[3] = {0, 0, 0};
};

data packet;
boolean rState = false;//these states are used to represent the current state of the buttons
boolean lState = false;

void loop() {

   if(readButtonR() == 'r'){ //toggle button state when button state change is detected
     rState = !rState;
   }

   if(readButtonL() == 'l'){ //toggle button state when button state change is detected
     lState=!lState;
   }

   packet.isPushedR = rState;
   packet.isPushedL = lState;

   uint8_t rc;
   float acc[3];
   rc = accelerometer.get_val(acc);

   if (rc == 0)
   {
     //we cast to drop the decimal, we don't need that high precision
     packet.acceleration[0] = (int8_t)(acc[0]*100); //x
     //Serial.print(packet.acceleration[0]); Serial.print(" ");
     packet.acceleration[1] = (int8_t)(acc[1]*100); //y
     //Serial.print(packet.acceleration[1]); Serial.print(" ");
     packet.acceleration[2] = (int8_t)(acc[2]*100); //z
     //Serial.println(packet.acceleration[2]);
   }

   radio.write((char*) &packet, sizeof(packet));
}
接收器:
#include
#include "RF24.h"

RF24 radio(9,10);

uint64_t pipes[2] = {0xF0F1F1F1F1, 0xF0F0F0F0F0}; //reading, writing

void initRadio()
{
 radio.setPALevel(RF24_PA_HIGH);
 //payload size default 32...
 radio.setChannel(10);
 radio.setCRCLength(RF24_CRC_16); //2-byte CRC
 radio.setDataRate(RF24_1MBPS); //1Mbps data rate

 radio.openReadingPipe(0, pipes[0]); //reading pipe
 radio.openWritingPipe(pipes[1]);

 radio.startListening();

}
#define R_PIN 6 //Red LED
#define G_PIN 7 //Green LED
#define Y_PIN 8 //Yellow LED

void setup() {
 Serial.begin(9600);
 while(!Serial); //wait until Serial is initialized...(we found that not including this line of code caused errors on the
                 //Teensy because it started executing code without ensuring that Serial communication with the laptop was
                 //properly initialized...
 radio.begin();
 initRadio();

 Mouse.screenSize(1920, 1080);  // configure screen size

 randomSeed(analogRead(0));

 pinMode(R_PIN, OUTPUT);
 pinMode(G_PIN, OUTPUT);
 pinMode(Y_PIN, OUTPUT);
}

#define CALIX 6 //calibration for X
#define CALIY -1 //calibration for Y

#define scalingFactor 0.05
#define THRESHOLD 1

double moveVector[2] = {0, 0};

void tiltToVector(const int8_t* acceleration){
 moveVector[0] = 0;
 moveVector[1] = 0;
 if(abs(acceleration[0] - CALIX) > THRESHOLD){ //calculate move
   moveVector[1] = (double)(acceleration[0] * scalingFactor);
 }
 if(abs(acceleration[1] - CALIY) > THRESHOLD) {
   moveVector[0] = (double)(acceleration[1] * scalingFactor);
 }
}

struct data
{
 boolean isPushedR = false;
 boolean isPushedL = false;
 int8_t acceleration[3] = {0, 0, 0};
};

data packet;

void loop() {

 bool stillWaiting = true;
 //Serial.println("About to read");
   while(stillWaiting){
     if(radio.available(0)){ //You've got mail!!!
       radio.read((char*) &packet, sizeof(packet));
       stillWaiting = false;
     }
   }

 Mouse.move(moveVector[0], moveVector[1]);
 Mouse.move(moveVector[0], moveVector[1]); //call it twice within the loop for smoothness :)

 //prints for debugging purposes
 Serial.println("Finished writing the pins");
 if (packet.isPushedR) {
   Serial.println("The right button has been clicked!!! (Did you mean to right click?!?!)");
 }

 if (packet.isPushedL) {
   Serial.println("The left button has been clicked!!! (Did you mean to left click?!?!)");
   //Mouse.click();
 }

 Serial.print("X: ");
 Serial.println(packet.acceleration[0]);

 Serial.print("Y: ");
 Serial.println(packet.acceleration[1]);

 Serial.print("Z: ");
 Serial.println(packet.acceleration[2]);

 tiltToVector(packet.acceleration); //re-calculate move vector coordinates


//  Mouse.move(moveVector[0], moveVector[1]);

}
將代碼上傳到Teensy與將代碼上傳到Arduino Uno略有不同。對(duì)于Uno,您只需按照通常的編譯和上傳步驟執(zhí)行即可:
依次選擇Tools > Board > Arduino/Genuino Uno
選擇端口(Port)
點(diǎn)擊Arduino IDE中的“Upload”(上傳)按鈕
而對(duì)于Teensy,請(qǐng)按照以下步驟上傳接收器代碼:
依次選擇Tools > Board > Teensy 3.2 / 3.1
依次選擇Tools > USB Type > Keyboard + Mouse + Joystick (我們將Teensy當(dāng)作一個(gè)USB設(shè)備使用)
點(diǎn)擊Arduino IDE中的“Upload”(上傳)按鈕
為了本教程的目的,我們不會(huì)詳細(xì)涉及所使用的不同通信協(xié)議,也不會(huì)詳細(xì)介紹RF模塊的通信軟件。要了解有關(guān)這些主題的更多信息,請(qǐng)查看我們的 通信協(xié)議 和 nRF24L01+ 模塊 教程 相反,我們將簡(jiǎn)要介紹軟件中主控制電路的工作原理。
在AirMouse中,發(fā)射器負(fù)責(zé)收集數(shù)據(jù),但大部分?jǐn)?shù)據(jù)處理由接收器模塊進(jìn)行。系統(tǒng)的這種設(shè)計(jì)方式使得Arduino——比Teensy更弱的處理器——只需要收集數(shù)據(jù)即可,因此能夠在決策和計(jì)算上花費(fèi)更少的資源,并能夠以更快的周期運(yùn)行。通過(guò)這種實(shí)現(xiàn)方法,兩臺(tái)設(shè)備之間唯一發(fā)送的數(shù)據(jù)就是原始加速計(jì)數(shù)據(jù)和按鈕數(shù)據(jù)。Teensy接收這些原始數(shù)據(jù)并進(jìn)行處理,從而在計(jì)算機(jī)屏幕上執(zhí)行相應(yīng)操作。
為了檢測(cè)AirMouse的方位,系統(tǒng)必須能夠解析原始加速計(jì)數(shù)據(jù)。要做到這一點(diǎn),首先必須確定每個(gè)坐標(biāo)的“零值”。零值的定義如下:AirMouse保持平坦(平行于地面)時(shí)每個(gè)軸的加速度計(jì)輸出。確定零值后,軟件就能夠?qū)⒓铀俣扔?jì)數(shù)據(jù)轉(zhuǎn)換為方向和數(shù)量,通過(guò)分析每個(gè)軸的加速度(由于重力)并將其與零值進(jìn)行比較以便在屏幕上移動(dòng)光標(biāo)。
現(xiàn)在,我們來(lái)看一下接收器模塊與電腦之間的交互。Teensy被指定為USB人機(jī)界面設(shè)備(這里是指USB鼠標(biāo))。解析方位數(shù)據(jù)后,軟件會(huì)計(jì)算光標(biāo)移動(dòng)的速度和方向。此外,該軟件還將點(diǎn)擊左鍵解析為左鍵單擊,將點(diǎn)擊右鍵解析為右鍵單擊,調(diào)用適當(dāng)?shù)姆椒ㄔ谟?jì)算機(jī)屏幕上顯示左鍵單擊或右鍵單擊功能。以下才是最酷的部分:您完全可以只通過(guò)軟件就能夠修改或添加鼠標(biāo)的屏幕功能!目前,鼠標(biāo)只具有最基本的功能和特性,但是您只需對(duì)軟件進(jìn)行簡(jiǎn)單改動(dòng),就可以輕松添加諸如滾動(dòng)、將光標(biāo)移至屏幕上的某個(gè)點(diǎn)等功能!(請(qǐng)點(diǎn)擊此處,了解Teensy USB鼠標(biāo)的參考指南) 以下是您可以實(shí)現(xiàn)的一些很酷的硬件和軟件想法:
將不同模式的按鍵點(diǎn)擊用作不同的控制功能(比如,雙擊右鍵關(guān)閉窗口)
添加滾動(dòng)功能!(同時(shí)點(diǎn)擊兩個(gè)按鍵變?yōu)椤皾L動(dòng)模式”)
添加其他鼠標(biāo)按鍵以執(zhí)行滾動(dòng)操作或?yàn)椴煌δ塬@取更多按鍵模式
我們希望您能夠喜歡這個(gè)AirMouse項(xiàng)目,并且非常期待您可以對(duì)設(shè)計(jì)和功能進(jìn)行修改和改進(jìn)!
作為UCLA IEEE高級(jí)項(xiàng)目(Advanced Projects)計(jì)劃的一部分,最初的AirMouse由Rahul Iyer、Aaron和Andrew Wilhelm研發(fā)。
審核編輯:湯梓紅
-
傳感器
+關(guān)注
關(guān)注
2553文章
51406瀏覽量
756624 -
發(fā)射器
+關(guān)注
關(guān)注
6文章
856瀏覽量
53651 -
Arduino
+關(guān)注
關(guān)注
188文章
6477瀏覽量
187827
發(fā)布評(píng)論請(qǐng)先 登錄
相關(guān)推薦
采用ROHM傳感器套件的DIY Arduino家庭安防系統(tǒng) 第2部分- Cayenne設(shè)置
使用觸摸傳感器的設(shè)備的輸入和控制,第2部分:控制器和開(kāi)發(fā)包
第1部分:MAX32660的特點(diǎn)原理介紹
DN236-1和2通道無(wú)延遲ΔΣ<sup>?</sup>24位ADC輕松實(shí)現(xiàn)多種傳感器的數(shù)字化,第1部分

DN237-1通道和2通道無(wú)延遲ΔΣ<sup>?</sup>24位ADC輕松實(shí)現(xiàn)多種傳感器的數(shù)字化,第2部分
用一個(gè)Hercules? LaunchPad? 開(kāi)發(fā)套件控制GaN功率級(jí)—第2部分
用Hercules? LaunchPad? 開(kāi)發(fā)套件控制GaN功率級(jí)—第1部分
利用Arduino Create和ROHM傳感器評(píng)估套件制作智能花園系統(tǒng)
用ROHM Arduino傳感器套件打造DIY萬(wàn)圣節(jié)僵尸面具
采用ROHM傳感器套件的DIY Arduino家庭安防系統(tǒng) 第2部分- Cayenne設(shè)置
采用ROHM傳感器套件的DIY Arduino家庭安防系統(tǒng) 第1部分 機(jī)制
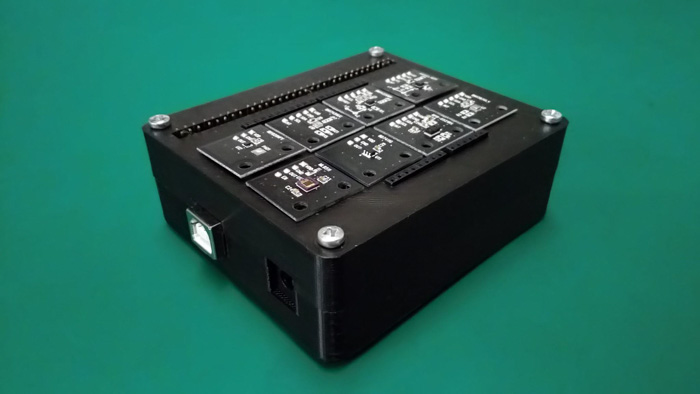
ROHM傳感器評(píng)估套件的3D外殼以及RohmMultiSensor庫(kù)更新
利用ROHM傳感器評(píng)估套件實(shí)現(xiàn)UCLA AirMouse–第1部分


 工商網(wǎng)監(jiān)
評(píng)論