") 鴻蒙實戰(zhàn)開發(fā)Camera組件:【相機(jī)】
鴻蒙實戰(zhàn)開發(fā)Camera組件:【相機(jī)】
相機(jī)組件支持相機(jī)業(yè)務(wù)的開發(fā),開發(fā)者可以通過已開放的接口實現(xiàn)相機(jī)硬件的訪問、操作和新功能開發(fā),最常見的操作如:預(yù)覽、拍照和錄像等。
基本概念
- 拍照
此功能用于拍攝采集照片。 - 預(yù)覽
此功能用于在開啟相機(jī)后,在緩沖區(qū)內(nèi)重復(fù)采集攝像幀,支持在拍照或錄像前進(jìn)行攝像幀預(yù)覽顯示。 - 錄像
此功能用于在開始錄像后和結(jié)束錄像前的時間段內(nèi),在緩沖區(qū)內(nèi)重復(fù)采集攝像幀,支持視頻錄制。
圖 1 相機(jī)組件架構(gòu)圖

目錄
倉目錄結(jié)構(gòu)如下:
/foundation/multimedia/camera_framework   # 相機(jī)組件業(yè)務(wù)代碼
├── frameworks                           # 框架代碼
│   ├── native                           # 內(nèi)部接口實現(xiàn)
│   │   ├── camera                       # 相機(jī)框架實現(xiàn)
│   │   └── metadata                     # 元數(shù)據(jù)實現(xiàn)
│   └── js                               # 外部接口實現(xiàn)
│       └── camera_napi                  # 相機(jī)NAPI實現(xiàn)
├── interfaces                           # 接口代碼
│   ├── inner_api                        # 內(nèi)部接口
│   └── kits                             # 外部接口
├── LICENSE                              # 許可證文件
├── ohos.build                           # 構(gòu)建文件
├── sa_profile                           # 服務(wù)配置文件
└── services                             # 服務(wù)代碼
    ├── camera_service                   # 相機(jī)服務(wù)實現(xiàn)
    └── etc                              # 相機(jī)服務(wù)配置
使用說明
拍照
拍照的步驟:
- 創(chuàng)建緩沖區(qū)消費者端監(jiān)聽器(CaptureSurfaceListener)以保存圖像。
class CaptureSurfaceListener : public IBufferConsumerListener { public: int32_t mode_; sptr< Surface > surface_; void OnBufferAvailable() override { int32_t flushFence = 0; int64_t timestamp = 0; OHOS::Rect damage; // initialize the damage OHOS::sptr< OHOS::SurfaceBuffer > buffer = nullptr; surface_- >AcquireBuffer(buffer, flushFence, timestamp, damage); if (buffer != nullptr) { void* addr = buffer- >GetVirAddr(); int32_t size = buffer- >GetSize(); // Save the buffer(addr) to a file. surface_- >ReleaseBuffer(buffer, -1); } } }; - 獲取相機(jī)管理器實例并獲取相機(jī)對象列表。
sptr< CameraManager > camManagerObj = CameraManager::GetInstance(); std::vector< sptr< CameraInfo >> cameraObjList = camManagerObj- >GetCameras(); - 使用相機(jī)對象創(chuàng)建相機(jī)輸入來打開相機(jī)。
sptr< CaptureInput > cameraInput = camManagerObj- >CreateCameraInput(cameraObjList[0]); - 創(chuàng)建采集會話。
sptr< CaptureSession > captureSession = camManagerObj- >CreateCaptureSession(); - 開始配置采集會話。
int32_t result = captureSession- >BeginConfig(); - 將相機(jī)輸入添加到采集會話。
result = captureSession- >AddInput(cameraInput); - 創(chuàng)建消費者 Surface 并注冊監(jiān)聽器以監(jiān)聽緩沖區(qū)更新。拍照的寬和高可以配置為所支持的 1280x960 分辨率。
sptr< Surface > photoSurface = Surface::CreateSurfaceAsConsumer(); int32_t photoWidth = 1280; int32_t photoHeight = 960; photoSurface- >SetDefaultWidthAndHeight(photoWidth, photoHeight); photoSurface- >SetUserData(CameraManager::surfaceFormat, std::to_string(OHOS_CAMERA_FORMAT_JPEG)); sptr< CaptureSurfaceListener > capturelistener = new(std::nothrow) CaptureSurfaceListener(); capturelistener- >mode_ = MODE_PHOTO; capturelistener- >surface_ = photoSurface; photoSurface- >RegisterConsumerListener((sptr< IBufferConsumerListener > &)capturelistener); - 使用上面創(chuàng)建的 Surface 創(chuàng)建拍照輸出。
sptr< CaptureOutput > photoOutput = camManagerObj- >CreatePhotoOutput(photoSurface); - 將拍照輸出添加到采集會話。
result = captureSession- >AddOutput(photoOutput); - 將配置提交到采集會話。
result = captureSession- >CommitConfig();
- 拍攝照片。
result = ((sptr PhotoOutput > &)photoOutput)- >Capture();
- 釋放采集會話資源。
captureSession- >Release();
- 釋放相機(jī)輸入關(guān)閉相機(jī)。
cameraInput- >Release();
開始和停止預(yù)覽
開始和停止預(yù)覽的步驟:
- 獲取相機(jī)管理器實例并獲取相機(jī)對象列表。
sptr< CameraManager > camManagerObj = CameraManager::GetInstance(); std::vector< sptr< CameraInfo >> cameraObjList = camManagerObj- >GetCameras(); - 使用相機(jī)對象創(chuàng)建相機(jī)輸入來打開相機(jī)。
sptr< CaptureInput > cameraInput = camManagerObj- >CreateCameraInput(cameraObjList[0]); - 創(chuàng)建采集會話。
sptr< CaptureSession > captureSession = camManagerObj- >CreateCaptureSession(); - 開始配置采集會話。
int32_t result = captureSession- >BeginConfig(); - 將相機(jī)輸入添加到采集會話。
result = captureSession- >AddInput(cameraInput); - 使用從窗口管理器獲得的 Surface 創(chuàng)建預(yù)覽輸出用以在顯示上渲染。預(yù)覽的寬和高可以配置為所支持的 640x480 或 832x480 分辨率,如果想保存到文件,可以按照拍照流程提到步驟,創(chuàng)建 Surface,注冊監(jiān)聽器以監(jiān)聽緩沖區(qū)更新。
int32_t previewWidth = 640; int32_t previewHeight = 480; previewSurface- >SetUserData(CameraManager::surfaceFormat, std::to_string(OHOS_CAMERA_FORMAT_YCRCB_420_SP)); sptr< CaptureOutput > previewOutput = camManagerObj- >CreateCustomPreviewOutput(previewSurface, previewWidth, previewHeight); - 將預(yù)覽輸出添加到采集會話。
result = captureSession- >AddOutput(previewOutput); - 將配置提交到采集會話。
result = captureSession- >CommitConfig(); - 開始預(yù)覽。
result = captureSession- >Start(); - 需要時停止預(yù)覽。
result = captureSession- >Stop();
- 釋放采集會話資源。
captureSession- >Release();
- 釋放相機(jī)輸入關(guān)閉相機(jī)。
cameraInput- >Release();
視頻錄像
視頻錄像的步驟:
- 獲取相機(jī)管理器實例并獲取相機(jī)對象列表。
sptr< CameraManager > camManagerObj = CameraManager::GetInstance(); std::vector< sptr< CameraInfo >> cameraObjList = camManagerObj- >GetCameras(); - 使用相機(jī)對象創(chuàng)建相機(jī)輸入來打開相機(jī)。
sptr< CaptureInput > cameraInput = camManagerObj- >CreateCameraInput(cameraObjList[0]); - 創(chuàng)建采集會話。
sptr< CaptureSession > captureSession = camManagerObj- >CreateCaptureSession(); - 開始配置采集會話。
int32_t result = captureSession- >BeginConfig(); - 將相機(jī)輸入添加到采集會話。
result = captureSession- >AddInput(cameraInput); - 通過 Surface 創(chuàng)建一個視頻輸出,來與音頻合成并保存到文件,Surface 通過 Recoder 獲取。如果想僅保存視頻緩沖數(shù)據(jù)到文件里,可以按照拍照流程提到步驟,創(chuàng)建 Surface,注冊監(jiān)聽器以監(jiān)聽緩沖區(qū)更新。錄像的分辨率可以在錄制器內(nèi)配置為所支持的 1280x720 或 640x360 分辨率。
videoSurface- >SetUserData(CameraManager::surfaceFormat, std::to_string(OHOS_CAMERA_FORMAT_YCRCB_420_SP)); sptr< CaptureOutput > videoOutput = camManagerObj- >CreateVideoOutput(videoSurface); - 將視頻輸出添加到采集會話。
result = captureSession- >AddOutput(videoOutput); - 將配置提交到采集會話。
result = captureSession- >CommitConfig(); - 開始視頻錄制。
result = ((sptr VideoOutput > &)videoOutput)- >Start(); - 需要時停止錄制。
result = ((sptr VideoOutput > &)videoOutput)- >Stop();
- 釋放采集會話的資源。
captureSession- >Release();
- 釋放相機(jī)輸入關(guān)閉相機(jī)。
cameraInput- >Release();
切換多個照相機(jī)設(shè)備
以下演示如何切換多個照相機(jī)設(shè)備。最初在采集會話中有一個視頻輸出(video output)。如果用戶想要切換其他 照相機(jī),現(xiàn)存的相機(jī)輸入和輸出需要先移除并加入新的相機(jī)輸入和輸出(示例中使用的是photo output)。
- 獲取相機(jī)管理器實例并獲取相機(jī)對象列表。
sptr< CameraManager > camManagerObj = CameraManager::GetInstance(); std::vector< sptr< CameraInfo >> cameraObjList = camManagerObj- >GetCameras(); - 使用相機(jī)對象創(chuàng)建相機(jī)輸入來打開相機(jī)。
sptr< CaptureInput > cameraInput = camManagerObj- >CreateCameraInput(cameraObjList[0]); - 創(chuàng)建采集會話。
sptr< CaptureSession > captureSession = camManagerObj- >CreateCaptureSession(); - 開始配置采集會話。
int32_t result = captureSession- >BeginConfig() - 將相機(jī)輸入添加到采集會話。
result = captureSession- >AddInput(cameraInput); - 通過Surface創(chuàng)建一個視頻輸出。
sptr< CaptureOutput > videoOutput = camManagerObj- >CreateVideoOutput(videoSurface); - 將視頻輸出添加到采集會話。
result = captureSession- >AddOutput(videoOutput); - 將配置提交到采集會話。
result = captureSession- >CommitConfig(); - 開始錄制視頻。
result = ((sptr VideoOutput > &)videoOutput)- >Start(); - 需要時停止錄制。
result = ((sptr VideoOutput > &)videoOutput)- >Stop();
- 重新配置會話并移除相機(jī)輸入和輸出。
int32_t result = captureSession- >BeginConfig();
- 在新的會話配置中移除相機(jī)輸入。
int32_t result = captureSession- >RemoveInput(cameraInput);
- 同樣移除相機(jī)輸出。
int32_t result = captureSession- >RemoveOutut(videoOutput);
- 創(chuàng)建新的相機(jī)輸入,并把它添加到采集會話。
sptr< CaptureInput > cameraInput2 = camManagerObj- >CreateCameraInput(cameraObjList[1]);
result = captureSession- >AddInput(cameraInput2);
- 創(chuàng)建拍照輸出,成功創(chuàng)建后將拍照輸出添加到采集會話。創(chuàng)建消費者 Surface 并注冊監(jiān)聽器以監(jiān)聽新的拍照輸出緩沖區(qū)更新。這個 Surface 用于新創(chuàng)建的拍照輸出。
// Get the surface
sptr< Surface > photoSurface = Surface::CreateSurfaceAsConsumer();
int32_t photoWidth = 1280;
int32_t photoHeight = 960;
photoSurface- >SetDefaultWidthAndHeight(photoWidth, photoHeight);
photoSurface- >SetUserData(CameraManager::surfaceFormat, std::to_string(OHOS_CAMERA_FORMAT_JPEG));
sptr< CaptureSurfaceListener > capturelistener = new(std::nothrow) CaptureSurfaceListener();
capturelistener- >mode_ = MODE_PHOTO;
capturelistener- >surface_ = photoSurface;
photoSurface- >RegisterConsumerListener((sptr< IBufferConsumerListener > &)capturelistener);

// Create the Photo Output
sptr< CaptureOutput > photoOutput = camManagerObj- >CreatePhotoOutput(photoSurface);

// Add the output to the capture session
result = captureSession- >AddOutput(photoOutput);
- 將配置提交到采集會話。
result = captureSession- >CommitConfig();
- 釋放被移出會話的相機(jī)輸入。
cameraInput- >Release();
- 拍攝照片。
result = ((sptr PhotoOutput > &)photoOutput)- >Capture();
- 釋放采集會話資源。
captureSession- >Release();
- 釋放相機(jī)輸入關(guān)閉相機(jī)。
cameraInput2- >Release();
設(shè)置閃光燈
拍照和錄像前可以在相機(jī)輸入里設(shè)置閃光燈。
在照相中設(shè)置閃光燈。
cameraInput- >LockForControl();
cameraInput- >SetFlashMode(OHOS_CAMERA_FLASH_MODE_OPEN);
cameraInput- >UnlockForControl();
在錄像中設(shè)置閃光燈。
cameraInput- >LockForControl();
cameraInput- >SetFlashMode(OHOS_CAMERA_FLASH_MODE_ALWAYS_OPEN);
cameraInput- >UnlockForControl();
關(guān)閉閃光燈。
cameraInput- >LockForControl();
cameraInput- >SetFlashMode(OHOS_CAMERA_FLASH_MODE_CLOSE);
cameraInput- >UnlockForControl();

聲明:本文內(nèi)容及配圖由入駐作者撰寫或者入駐合作網(wǎng)站授權(quán)轉(zhuǎn)載。文章觀點僅代表作者本人,不代表電子發(fā)燒友網(wǎng)立場。文章及其配圖僅供工程師學(xué)習(xí)之用,如有內(nèi)容侵權(quán)或者其他違規(guī)問題,請聯(lián)系本站處理。
舉報投訴
-
Camera
+關(guān)注
關(guān)注
0文章
79瀏覽量
20899 -
鴻蒙
+關(guān)注
關(guān)注
57文章
2392瀏覽量
43055
發(fā)布評論請先 登錄
相關(guān)推薦
鴻蒙Flutter實戰(zhàn):14-現(xiàn)有Flutter 項目支持鴻蒙 II
分別安裝官方的3.22版本,以及鴻蒙社區(qū)的 3.22.0 版本
3.搭建 Flutter鴻蒙開發(fā)環(huán)境
參考文章《鴻蒙Flutter實戰(zhàn):0
發(fā)表于 12-26 14:59
鴻蒙Flutter實戰(zhàn):09-現(xiàn)有Flutter項目支持鴻蒙
# 鴻蒙Flutter實戰(zhàn):現(xiàn)有Flutter項目支持鴻蒙
## 背景
原來使用Flutter開發(fā)的項目,需要適配鴻蒙。
## 環(huán)境搭
發(fā)表于 10-23 16:36
鴻蒙Flutter實戰(zhàn):08-如何調(diào)試代碼
# 鴻蒙Flutter實戰(zhàn):如何調(diào)試代碼
## 1.環(huán)境搭建
參考文章[鴻蒙Flutter實戰(zhàn):01-搭建開發(fā)環(huán)境](https://g
發(fā)表于 10-23 16:29
鴻蒙Flutter實戰(zhàn):07混合開發(fā)
# 鴻蒙Flutter實戰(zhàn):混合開發(fā)
鴻蒙Flutter混合開發(fā)主要有兩種形式。
## 1.基于har
將flutter module
發(fā)表于 10-23 16:00
51camera 2024產(chǎn)品型錄-工業(yè)相機(jī)、工業(yè)鏡頭、光源
51camera 2024產(chǎn)品型錄涵蓋了工業(yè)相機(jī)、工業(yè)鏡頭、光源、采集卡、工控機(jī)、線纜等視覺器件產(chǎn)品型號。
發(fā)表于 10-18 16:31
?0次下載
HarmonyOS實戰(zhàn)開發(fā)-深度探索與打造個性化自定義組件
今天分享一下 什么是自定義組件?及其自定義組件的實戰(zhàn)。
做過前端或者android開發(fā)的都知道自定義組件,
發(fā)表于 05-08 16:30
HarmonyOS實戰(zhàn)開發(fā)-如何使用全局狀態(tài)保留能力彈窗來實現(xiàn)評論組件。
開發(fā)有幫助,我想邀請大家?guī)臀胰齻€小忙:
點贊,轉(zhuǎn)發(fā),有你們的 『點贊和評論』,才是我創(chuàng)造的動力。
關(guān)注小編,同時可以期待后續(xù)文章ing?,不定期分享原創(chuàng)知識。
更多鴻蒙最新技術(shù)知識點,請關(guān)注作者博客:鴻蒙
發(fā)表于 05-07 15:06
OpenHarmony實戰(zhàn)開發(fā)-如何實現(xiàn)組件動畫。
ArkUI為組件提供了通用的屬性動畫和轉(zhuǎn)場動畫能力的同時,還為一些組件提供了默認(rèn)的動畫效果。例如,List的滑動動效,Button的點擊動效,是組件自帶的默認(rèn)動畫效果。在組件默認(rèn)動畫效

鴻蒙OS開發(fā)實例:【組件化模式】
組件化一直是移動端比較流行的開發(fā)方式,有著編譯運行快,業(yè)務(wù)邏輯分明,任務(wù)劃分清晰等優(yōu)點,針對Android端的組件化;與Android端的組件化相比,HarmonyOS的
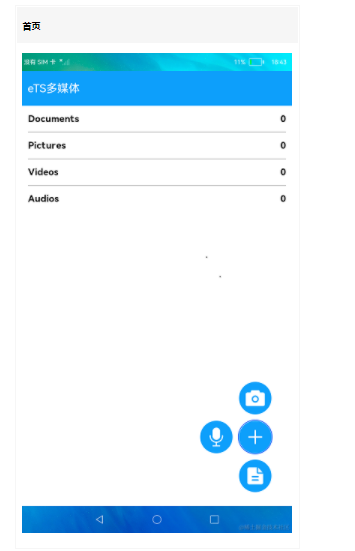
鴻蒙實戰(zhàn)開發(fā):【相機(jī)和媒體庫】
在ArkTS中調(diào)用相機(jī)拍照和錄像,以及如何使用媒體庫接口進(jìn)行媒體文件的增、刪、改、查操作。本示例用到了
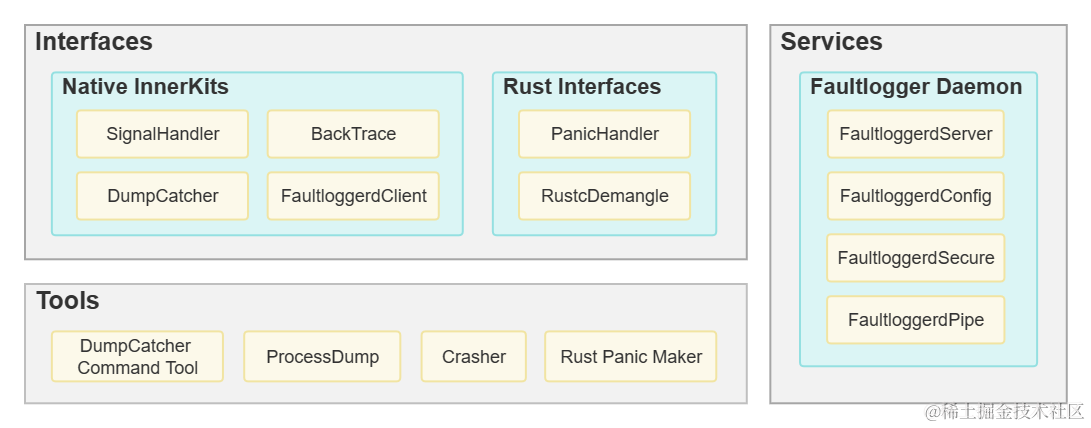
鴻蒙實戰(zhàn)開發(fā)學(xué)習(xí)【FaultLoggerd組件】
Faultloggerd部件是OpenHarmony中C/C++運行時崩潰臨時日志的生成及管理模塊。面向基于 Rust 開發(fā)的部件,F(xiàn)aultloggerd 提供了Rust Panic故障日志生成能力。系統(tǒng)開發(fā)者可以在預(yù)設(shè)的路徑下找到故障日志,定位相關(guān)問題。
鴻蒙開發(fā)實戰(zhàn):【藍(lán)牙組件】
藍(lán)牙服務(wù)組件為設(shè)備提供接入與使用Bluetooth的相關(guān)接口,包括BLE設(shè)備gatt相關(guān)的操作,以及BLE廣播、掃描等功能。
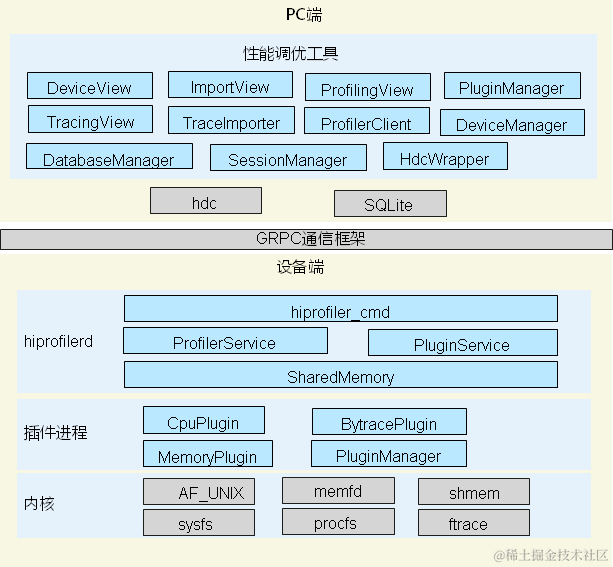
鴻蒙開發(fā)實戰(zhàn):【性能調(diào)優(yōu)組件】
性能調(diào)優(yōu)組件包含系統(tǒng)和應(yīng)用調(diào)優(yōu)框架,旨在為開發(fā)者提供一套性能調(diào)優(yōu)平臺,可以用來分析內(nèi)存、性能等問題
鴻蒙實戰(zhàn)開發(fā):【FaultLoggerd組件】講解
Faultloggerd部件是OpenHarmony中C/C++運行時崩潰臨時日志的生成及管理模塊。面向基于 Rust 開發(fā)的部件,F(xiàn)aultloggerd 提供了Rust Panic故障日志生成能力。系統(tǒng)開發(fā)者可以在預(yù)設(shè)的路徑下找到故障日志,定位相關(guān)問題。
鴻蒙實戰(zhàn)項目開發(fā):【短信服務(wù)】
、OpenHarmony 多媒體技術(shù)、Napi組件、OpenHarmony內(nèi)核、Harmony南向開發(fā)、鴻蒙項目實戰(zhàn)等等)鴻蒙(Harmon
發(fā)表于 03-03 21:29


 工商網(wǎng)監(jiān)
評論