 使用 GPT4V+AI Agent 做自動 UI 測試的探索
一、背景
從 Web 誕生之日起,UI 自動化就成了測試的難點,到現在近 30 年,一直沒有有效的手段解決Web UI測試的問題,盡管發展了很多的 webdriver 驅動,圖片 diff 驅動的工具,但是這些工具的投入產出比一直被質疑,自動化率越多維護成本越高,大部分都做著就放棄了,還有一部分在做與不做間糾結。
本文結合一些開源的項目探索使用GPT 自動做 UI 測試的可能性。
二、方案選型
當前UI 的主要問題:一個是通過 Webdriver 控制瀏覽器執行,這些工具都需要先查找到對應元素的 Elements,無論是錄制的還是自己編寫的在面對 UI 變化,元素變化時都需要耗費很大的精力去重新識別,解析 Dom 查找,這個工作乏味且沒有效率;另一種是通過圖像進行點擊,比如 Sikuli 這種工具,主要的問題也是復用性較差,換個分辨率的機器或者圖片發生少的改動就不可用。
使用 GPT 做 UI 測試嘗試了兩種方案:
第一種將 Html 元素投喂給 GPT,主要方法獲取 Html代碼,對 Html 做初步縮減處理,再做向量化,然后喂給 GPT4 自動生成 Webdriver 驅動腳本,效果一般,而且因為 Html 比較大,Token 的消耗很大。
第二種思路是讓 GPT 像人一樣思考和測試,比如一個人打開一個網頁后,他通過眼睛看到的頁面文字或圖標,然后用手完成點擊和輸入的操作,最后通過頁面的彈窗或者文字來識別是否有錯誤,這幾個動作通過大腦統一協調。
這里主要介紹第二種.
三、新方案實踐
1.新方案簡介
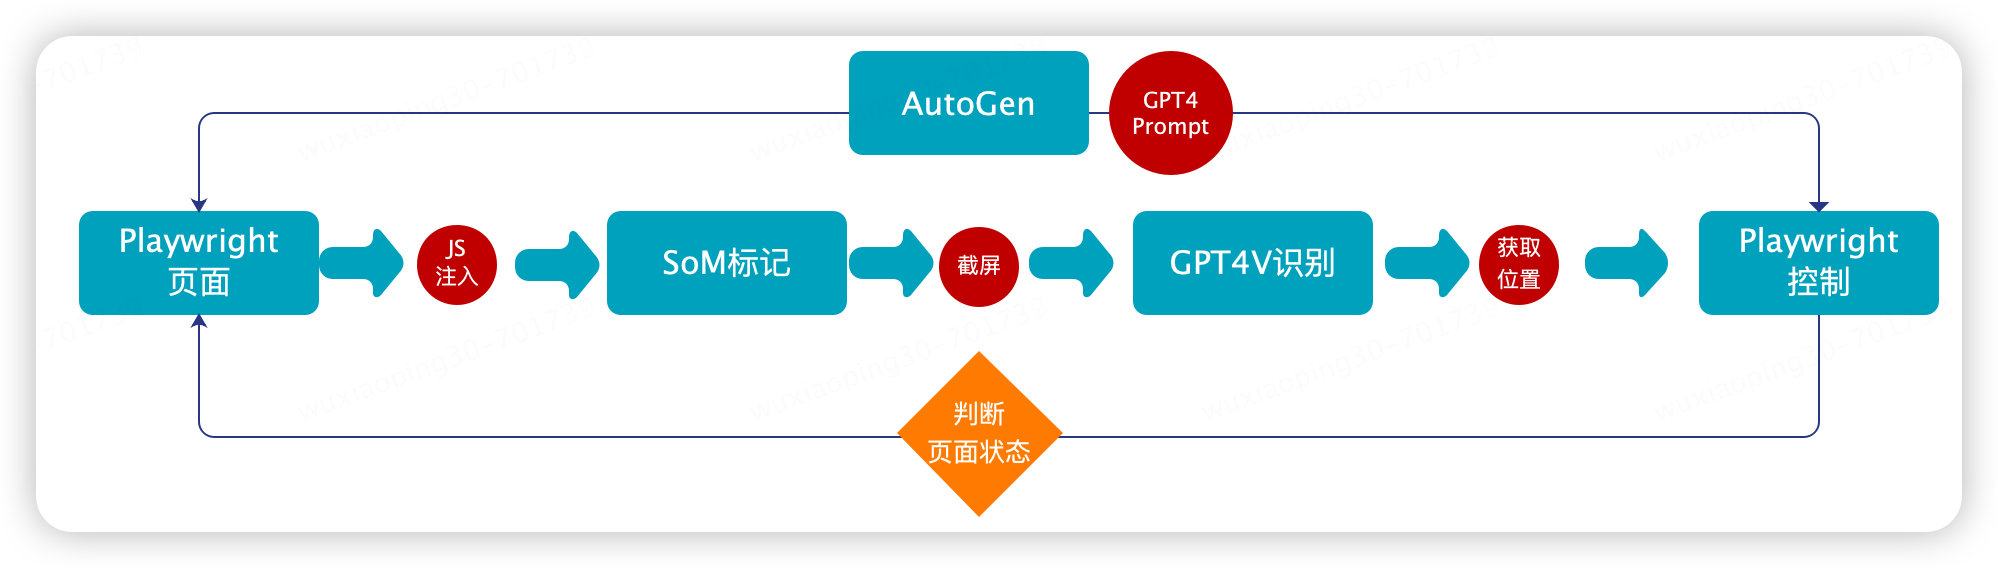
新的方案主要結合 Playwright,SoM視覺標記,GPT4Vison,GPT4,AutoGen來實現。主要的原理
通過 Playwright進行瀏覽器操作,包括頁面圖像的獲取、瀏覽器的各種操作,相當于‘‘手’’;
進行SoM 視覺數據標記,因為 GPT4Vison 在進行頁面原始識別時并不是很準確,參考微軟的論文可以通過視覺標記的手段來輔助 GPT4V 識別,相當于“眼睛”。
通過GPT4+AutoGen 將這些步驟串起來實現協調控制,相當于“大腦”和“神經中樞”。
2.主要架構
?
3.實現步驟
1. 使用 Playwright 注入 JS
browser = playwright.chromium.launch(channel="chrome",headless=False)
context = browser.new_context()
page = context.new_page()
page.goto("http://oa.jd.com/")
inject_js ="./pagemark.js"
withopen(inject_js,'r')asfile:
    content =file.read()
    page.evaluate(f"{content}")
2. SoM 視覺提示標記
如前文提到的 GPT4V 并不能有效的識別 Web 的元素,所以在使用 GPT4V 之前進行圖像標記,圖像標記現在有兩種方式,一種是通過 AI 識別圖片進行標記,這種主要利用在對靜態圖片圖像的識別,對于 Web 頁面的標記,我們可以采用注入 JS 修改頁面元素的方式來標記。這里通過在瀏覽器中注入 pagemark.js,利用 Playwright 執行 js 函數來完成頁面的標記,該 JS 能夠完成標準的coco annotation的標注。
// DOM Labelerlet labels =[];functionunmarkPage(){
 for(const label of labels){
 document.body.removeChild(label);
 }

 labels =[];
 }

 functionmarkPage(){
 unmarkPage();

 var bodyRect = document.body.getBoundingClientRect();

 var items =Array.prototype.slice.call(
 document.querySelectorAll('*')
 ).map(function(element){
 var vw = Math.max(document.documentElement.clientWidth ||0, window.innerWidth ||0);
 var vh = Math.max(document.documentElement.clientHeight ||0, window.innerHeight ||0);

 var rects =[...element.getClientRects()].filter(bb=>{
 var center_x = bb.left + bb.width /2;
 var center_y = bb.top + bb.height /2;
 var elAtCenter = document.elementFromPoint(center_x, center_y);

  return elAtCenter === element || element.contains(elAtCenter)
 }).map(bb=>{
 const rect ={
 left: Math.max(0, bb.left),
 top: Math.max(0, bb.top),
 right: Math.min(vw, bb.right),
 bottom: Math.min(vh, bb.bottom)
  };
  return{
 ...rect,
 width: rect.right - rect.left,
 height: rect.bottom - rect.top
  }
  });

  var area = rects.reduce((acc, rect)=> acc + rect.width * rect.height,0);

 return{
 element: element,
 include:
 (element.tagName ==="INPUT"|| element.tagName ==="TEXTAREA"|| element.tagName ==="SELECT")||
 (element.tagName ==="BUTTON"|| element.tagName ==="A"||(element.onclick !=null)|| window.getComputedStyle(element).cursor =="pointer")||
 (element.tagName ==="IFRAME"|| element.tagName ==="VIDEO")
 ,
 area,
 rects,
 text: element.textContent.trim().replace(/s{2,}/g,' ')
 };
 }).filter(item=>
 item.include &&(item.area >=20)
 );

 // Only keep inner clickable items
 items = items.filter(x=>!items.some(y=> x.element.contains(y.element)&&!(x == y)))

 // Function to generate random colors
 functiongetRandomColor(){
 var letters ='0123456789ABCDEF';
 var color ='#';
 for(var i =0; i {
 newElement = document.createElement("div");
 var borderColor =getRandomColor();
 newElement.style.outline =`2px dashed ${borderColor}`;
 newElement.style.position ="fixed";
 newElement.style.left = bbox.left +"px";
 newElement.style.top = bbox.top +"px";
 newElement.style.width = bbox.width +"px";
 newElement.style.height = bbox.height +"px";
 newElement.style.pointerEvents ="none";
 newElement.style.boxSizing ="border-box";
 newElement.style.zIndex =2147483647;
 // newElement.style.background = `${borderColor}80`;
 // Add floating label at the corner
 var label = document.createElement("span");
 label.textContent = index;
 label.style.position ="absolute";
 label.style.top ="-19px";
 label.style.left ="0px";
 label.style.background = borderColor;
 label.style.color ="white";
 label.style.padding ="2px 4px";
 label.style.fontSize ="12px";
 label.style.borderRadius ="2px";
 newElement.appendChild(label);

 document.body.appendChild(newElement);
  labels.push(newElement);
  console.log(index)

  });
  })
 }
以某系統為例,標注后的效果如下圖:
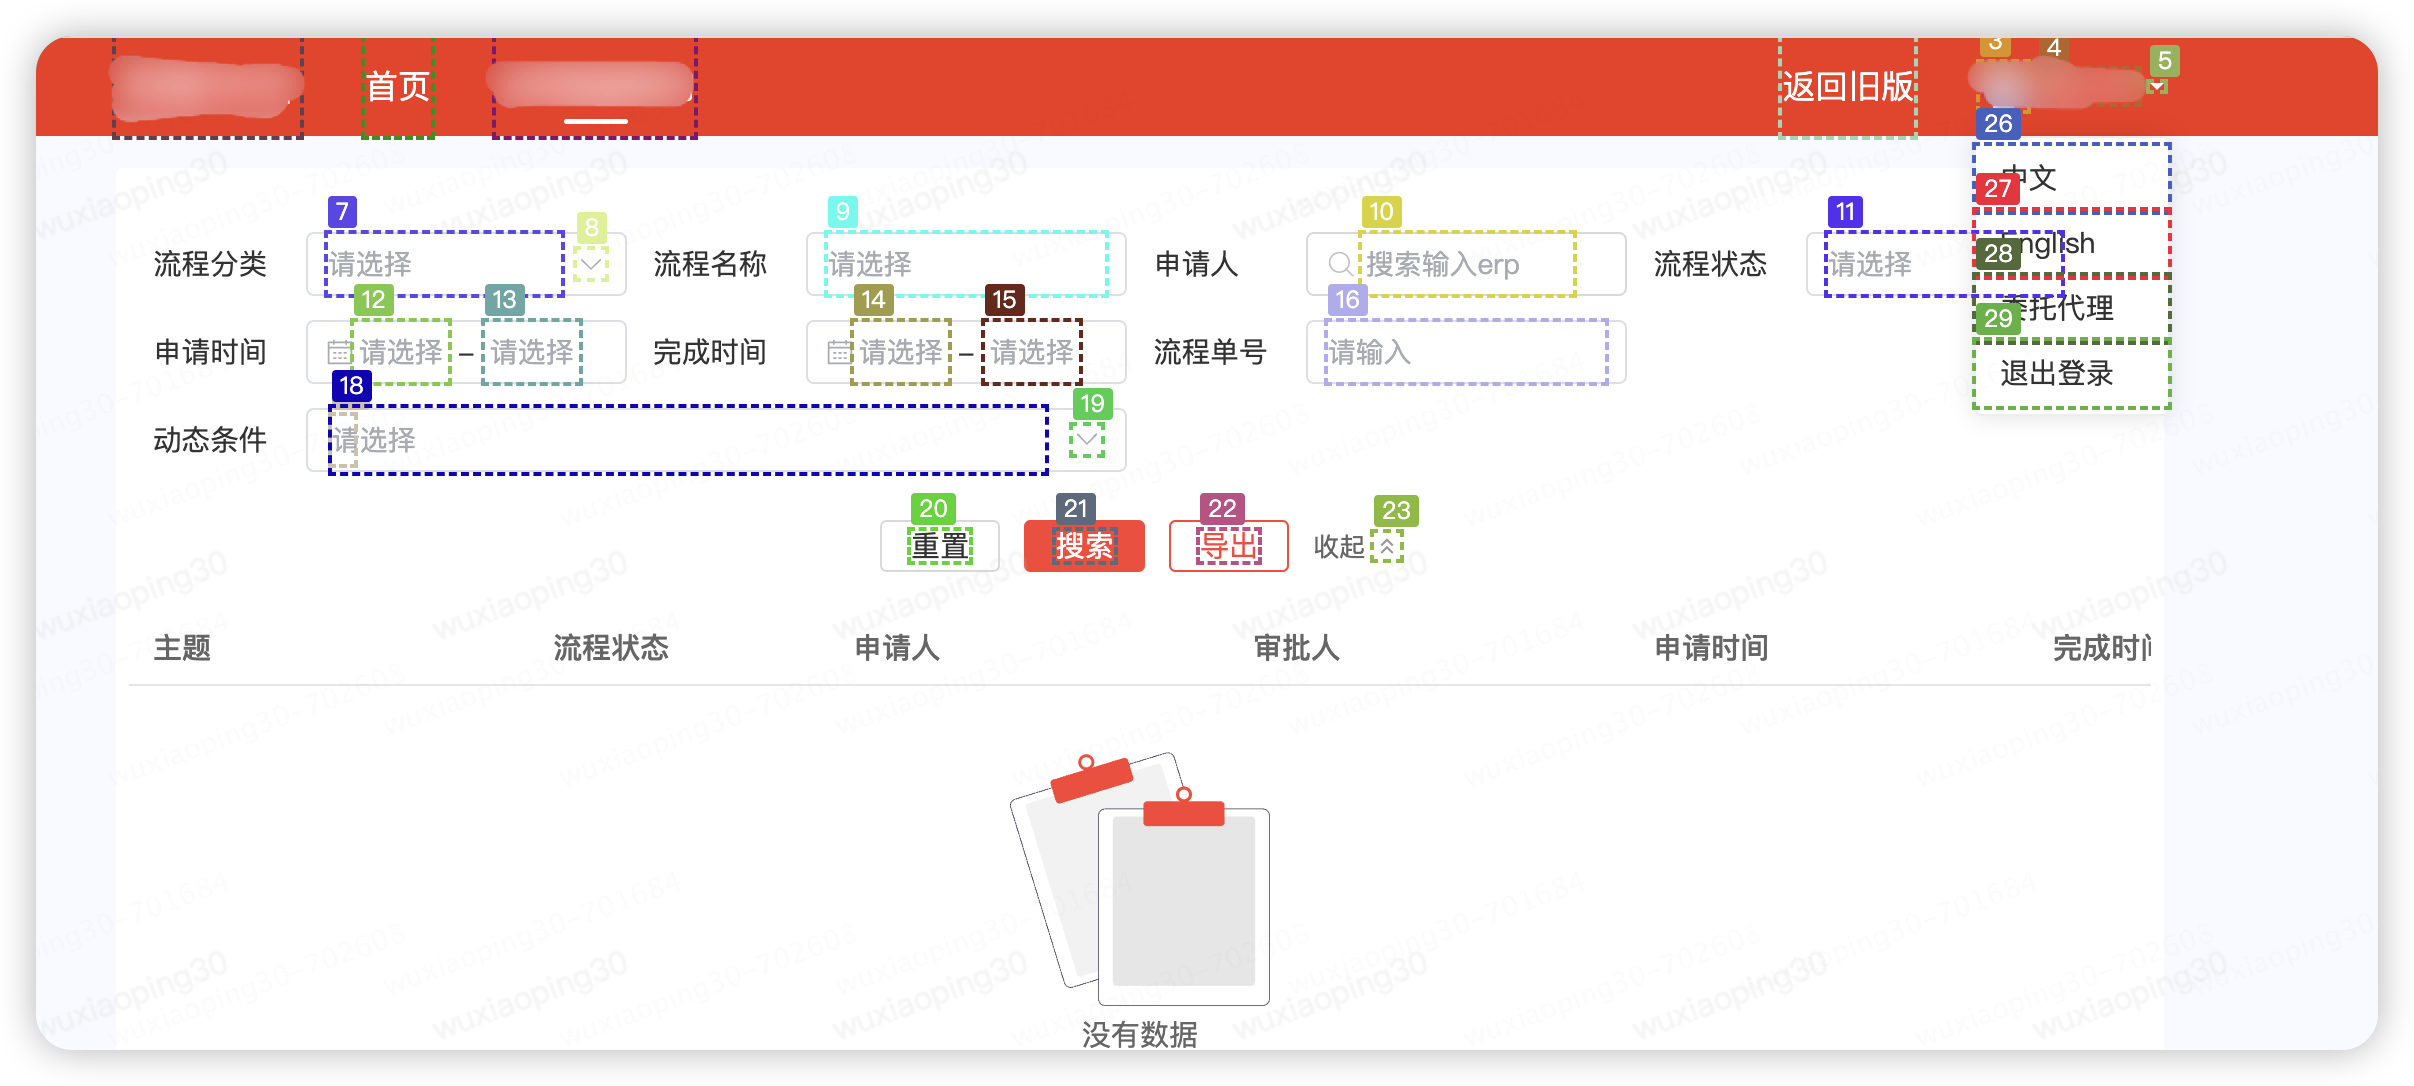
將標記元素的位置編號保存到本地coco.json
{
    "1":{"x":"10","y":"40","w":"8","h":"10","center_x":"30","center_y":"13"},
    "2":{"x":"20","y":"40","w":"16","h":"10","center_x":"30","center_y":"21"},
    "10":{"x":"40","y":"80","w":"16","h":"10","center_x":"80","center_y":"21"}}
其中 center_x, center_y 為元素的中心點坐標
3.GPT4V 識別
Prompt
我上傳了一張網頁截圖,頁面元素已經使用COCO Annotator進行了數字標記。
請分析這張圖片,并識別出網頁的用途以及各個標記元素的功能。基于你的分析,請生成一個規劃路徑來完成以下任務:
- 輸入ERP搜索。
- 檢查列表是否為空
請使用圖片中的數字標記來描述完成任務的具體步驟。
GPT4V Response
這張圖片顯示的是一個具有多個數字標記的網頁截圖。根據這些標記,我們可以推測出網頁的用途以及各個元素的功能。
為了完成您提出的任務,我們可以按照以下步驟操作:
nn1. 使用標記為10的搜索框輸入ERP搜索詞。這個搜索框的標簽顯示為“搜索框輸入erp”,表明它用于輸入搜索詞。
nn2. 點擊標記為17的搜索按鈕。這個按鈕的標簽是“搜索”,表明它用于提交搜索請求。
nn3. 檢查列表是否為空。這個步驟可能需要查看標記為19的區域,這個區域被標記為“列表內容”,如果這個區域沒有顯示任何內容或者有提示信息顯示列表為空,則說明搜索結果為空。
nn以 上步驟基于圖片中的數字標記和元素標簽來描述完成任務的具體操作。"
提取元素坐標
利用正則表達式從GPT4V 的 response 中提取查詢到的元素的 bbox id= 10,17,19, 結合在 SoM 標記中記錄的 json 文件,找到編號 10 的元素坐標"10":{"x":"40","y":"80","w":"16","h","10","center_x":"80","center_y":"21"}
class GPT4VRecognize
     def get_location(self, query):
         coco_json='./coco.json'
         withopen(coco_json,'r') as file:
             content =file.read()
         matches=re.findall(r'd+',gpt4v_response_content)
         num=-1
         iflen(matches)>0:
             num=matches[0]
         data = json.loads(json_str)
         center_x = data[num]["center_x"]
         center_y = data[num]["center_y"]
         return center_x,center_y
4.Playwright操作頁面
Playwright是一個非常強大的操作瀏覽器的工具,這里因為前面已經通過 GPT4V 識別了圖片,所以我們主要通過 坐標 的方式來控制元素,不再需要解析Dom 來控制,主要的包括,點擊,雙擊,鼠標拖動,輸入,截圖等:
class Actions:
    page=None
    __init__(self,url):
        global page
        browser = playwright.chromium.launch(channel="chrome",headless=False)
        context = browser.new_context()
        page = context.new_page()
        page.goto("http://oa.jd.com/")
    def mouse_move(self,x,y):
        page.mouse.move(self,x,y)
    def screenshot(self):
        page.screenshot()
    def mouse_click(self,x,y):
        page.mouse.click(self,x,y)
    def input_text(self,x,y,text):
        page.mouse.click(self,x,y)
        page.keyboard.type(text)
    def mouse_db_click(self,x,y):
    def select_option(self,x,y,option):
    ......
5.使用 AutoGen編排
AutoGen是一個代理工具,它能夠代理多個 LLM在不同會話間切換,能夠自動的調用預定的函數,并協調這些 LLM 完成任務。
在上面的程序中,實現了:眼睛:通過 GPT4V 來識別元素;手:通過 Playwright 來做各種操作;后面需要通過一個大腦來協調手、眼完成任務,這里通過 GPT4+AutoGen 來實現大腦的協同調度。
config_list = config_list_from_json(env_or_file="OAI_CONFIG_LIST")
assistant= autogen.AssistantAgent(
name="assistant",
system_message=
    """
    You are the orchestrator responsible for completing a task involving the UI window.
    Utilize the provided functions to take a screenshot after each action.
    Remember to only use the functions you have been given and focus on the task at hand.
     """,
 llm_config={"config_list": config_list},
)
 user_proxy = autogen.UserProxyAgent(
 name="brain_proxy",
 human_input_mode="NEVER",
 code_execution_config={"work_dir":"coding"},
 max_consecutive_auto_reply=10,
 llm_config={"config_list": config_list},)

action = Actions(url)
gpt4v=GPT4VRecognize()
user_proxy.register_function(
     function_map={
         "get_location": gpt4v.get_location,
         "mouse_move":action.mouse_move,
         "screenshot":action.screenshot,
         "mouse_click":action.mouse_click,
         "mouse_dbclick":action.mouse_dbclick,
         "select_option":action.select_option
     })
def run(message_ask):
    user_proxy.initiate_chat(assistant,message=message_ask)

if __name__ =="__main__":
    run("通過 輸入erp 'wwww30' 搜索結果,并檢查是否返回空列表")
四、問題和后續
1.當前的主要問題
本文主要拋磚引玉,通過一種完全按人類思維進行 UI測試的方式,在實驗過程中還有很多問題待解決。
1. GPT 在中文語境下識別的不太友好,在實驗過程中對中文的 prompt 理解有誤,需要不斷的優化 prompt,尤其是頁面中的中文元素。
2. AutoGen 對于處理預定義的動作也會有問題,需要不斷調優。
3. GPT4V 真的很貴。
2.未來的想法
1. 將每次向 GPT4V請求的圖像識別做本地化處理,結合現有的一些測試方法,從而減少 Token,縮短執行耗時。
2. 面向業務的 GPT需要不斷訓練,將系統使用手冊和一有的 PRD 文檔投喂給 GPT,增強 gpt 的系統識別和測試能力。
五、參考
1.Set-of-Mark Prompting Unleashes Extraordinary Visual Grounding in GPT-4V?
2.Microsoft AutoGen?
3.GPT-4V-ACT?
審核編輯 黃宇
-
測試
+關注
關注
8文章
5375瀏覽量
127057 -
AI
+關注
關注
87文章
31513瀏覽量
270323 -
GPT
+關注
關注
0文章
360瀏覽量
15505
發布評論請先 登錄
相關推薦
研華AI Agent引領工業物聯網應用革新
如何在邊緣端獲得GPT4-V的能力:算力魔方+MiniCPM-V 2.6

【書籍評測活動NO.55】AI Agent應用與項目實戰
富匙科技推出AI Agent,加速東南亞市場拓展
微軟Dynamics365集成10大自主AI Agent,引領智能自動化新時代
OpenAI解鎖GPT-4o定制功能,助力企業精準優化AI應用
OpenAI 推出 GPT-4o mini 取代GPT 3.5 性能超越GPT 4 而且更快 API KEY更便宜
開發者如何調用OpenAI的GPT-4o API以及價格詳情指南
GPT-4o更像“人”,AI“疾步”走向商業化應用

OpenAI推出面向所有用戶的AI模型GPT-4o
OpenAI全新GPT-4o能力炸場!速度快/成本低,能讀懂人類情緒
微軟Copilot全面更新為OpenAI的GPT-4 Turbo模型
新火種AI|秒殺GPT-4,狙殺GPT-5,橫空出世的Claude 3振奮人心!


 工商網監
工商網監
評論