 電子發燒友App


最近在折騰rust與數據庫集成,選了Tidb Cloud Serverless Tier 作為數據源。Tidb 無疑是近五年來最優秀的國產開源分布式數據庫,Tidb Cloud Serverless Tier作為pingcap旗下的云產品方便又經濟,這次使用還有一些小驚喜,這個后文再說。硬廣時間到這里,咱們說正事兒。
Tidb Cloud Serverless Tier 的使用文檔還是很全面的,詳細情況請參考:使用 TiDB Cloud (Serverless Tier) 構建 TiDB 集群(https://docs.pingcap.com/zh/tidb/stable/dev-guide-build-cluster-in-cloud#%E7%AC%AC-1-%E6%AD%A5%E5%88%9B%E5%BB%BA%E5%85%8D%E8%B4%B9%E9%9B%86%E7%BE%A4)
集群建立完成后,Tidb Cloud Serverless Tier 有個小功能是可以顯示主流客戶端以及流行編程語言的連接代碼。包括: MysqlCli、MyCli、JDBC、Python、golang以及Nodejs。
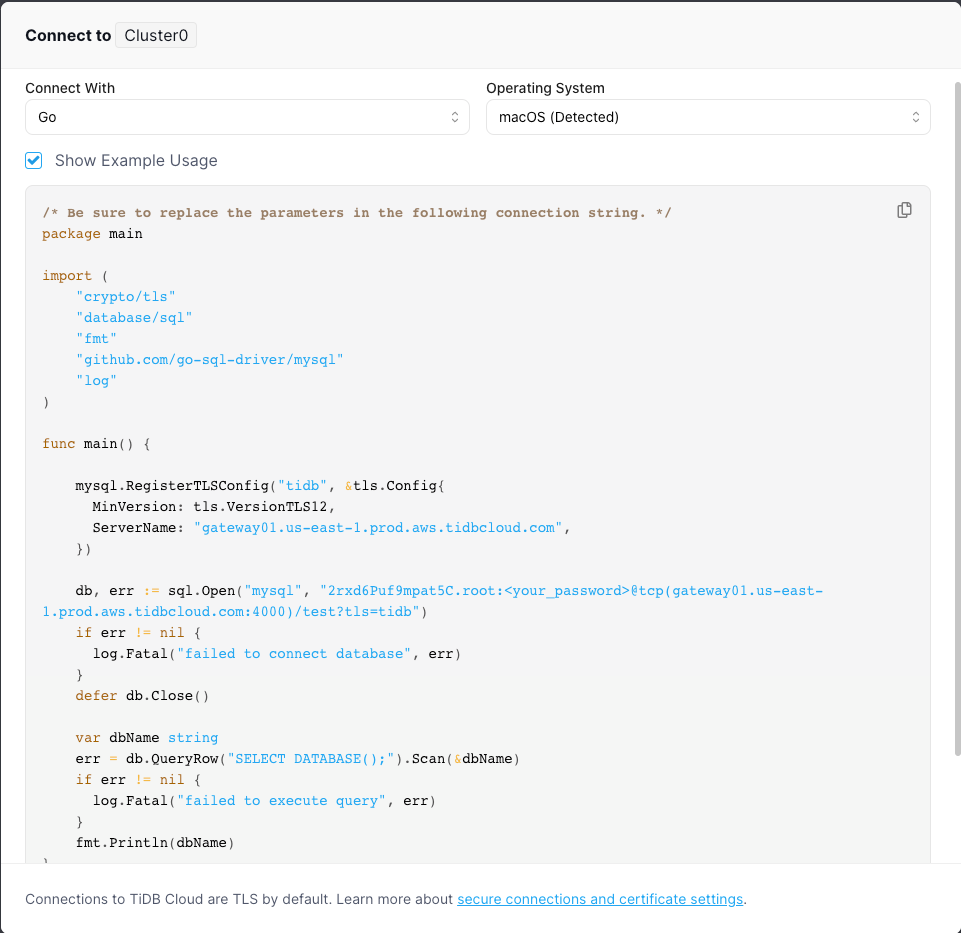
嗯?rust 的代碼在哪兒?很遺憾沒有rust的代碼。而且為了安全起見,Tidb Cloud Serverless Tier 貌似只支持安全連接。在查找文檔過程中rust 的 數據庫驅動和很多orm文檔中也沒有關于安全詳細的描述,不少思路是在issues里面給出的。索性把rust 連接 mysql 主流方式的安全連接代碼都記錄下來,一來給自己留個備忘,二來給需要的同學做個提示。
以下實例所使用的的標的建表語句如下
CREATE TABLE IF NOT EXISTS sample (
        id BIGINT NOT NULL ,
        name VARCHAR(128) NOT NULL,
        gender TINYINT NOT NULL,
        mobile VARCHAR(11) NOT NULL,
        create_time DATETIME NOT NULL,
        update_time DATETIME NOT NULL,
        PRIMARY KEY(id)
    ) ENGINE=InnoDB DEFAULT CHARSET=utf8;
mysql rust driver
rust-mysql-simple(https://github.com/blackbeam/rust-mysql-simple),純 rust 實現的 mysql 驅動。
依賴
[dependencies]
# mysql origin
mysql = "*"
代碼
use chrono::Local;
use mysql::prelude::*;
use mysql::*;
use rbatis::snowflake::new_snowflake_id;
use serde::Deserialize;
use serde::Serialize;


pub const TABLE_NAME: &str = "sample";


#[derive(Clone, Debug, Serialize, Deserialize)]
pub struct BizOrigin {
    pub id: i64,
    pub name: String,
    pub gender: u8,
    pub mobile: String,
    pub create_time: Option,
    pub update_time: Option,
}


fn main() -> std::Result<(), Box> {
    let fmt = "%Y-%m-%d %H:%M:%S";
    // 原生方式連接
    let cert_path = std::new("/etc/ssl/cert.pem");
    let ssl_opts = SslOpts::default().with_root_cert_path(Some(cert_path));
    let opts = OptsBuilder::new()
        .ip_or_hostname(Some("gateway01.us-east-19.prod.aws.tidbcloud.com"))
        .tcp_port(4000)
        .user(Some("tidbcloudtier.root"))
        .pass(Some("xxxxxxxxxxxx"))
        .ssl_opts(ssl_opts)
        .db_name(Some("test"));


    let mut conn_origin = Conn::new(opts)?;
    let (_, cipher_origin): (Value, String) = "SHOW STATUS LIKE 'Ssl_cipher'"
        .first(&mut conn_origin)?
        .unwrap();
    println!(">>>>> Cipher in use from origin: {}", cipher_origin);


    let create_statment = format!(
        "
    CREATE TABLE IF NOT EXISTS {} (
        id BIGINT NOT NULL ,
        name VARCHAR(128) NOT NULL,
        gender TINYINT NOT NULL,
        mobile VARCHAR(11) NOT NULL,
        create_time DATETIME NOT NULL,
        update_time DATETIME NOT NULL,
        PRIMARY KEY(id)
    ) ENGINE=InnoDB DEFAULT CHARSET=utf8;",
        TABLE_NAME
    );
    conn_origin.query_drop(create_statment)?;


    let bizes = vec![
        BizOrigin {
            id: new_snowflake_id(),
            name: "Bob".to_string(),
            gender: 1,
            mobile: "13037777876".to_string(),
            create_time: Some(Local::now().format(fmt).to_string()),
            update_time: Some(Local::now().format(fmt).to_string()),
        },
        BizOrigin {
            id: new_snowflake_id(),
            name: "Jecika".to_string(),
            gender: 0,
            mobile: "13033457876".to_string(),
            create_time: Some(Local::now().format(fmt).to_string()),
            update_time: Some(Local::now().format(fmt).to_string()),
        },
    ];


    conn_origin.exec_batch(
        r"insert into sample (id,name,gender,mobile,create_time,update_time)
    values (:id,:name,:gender,:mobile,:create,:update)",
        bizes.iter().map(|p| -> Params {
            params! {
                "id"=>p.id,
                "name"=>p.name.to_owned(),
                "gender"=>p.gender.to_owned(),
                "mobile"=>p.mobile.to_owned(),
                "create"=>p.create_time.as_ref(),
                "update"=>p.update_time.as_ref()
            }
        }),
    )?;


    // Let's select payments from database. Type inference should do the trick here.
    let selected_bizs = conn_origin.query_map(
        "SELECT id,name,gender,mobile,create_time,update_time from sample",
        |(id, name, gender, mobile, create_time, update_time)| BizOrigin {
            id,
            name,
            gender,
            mobile,
            create_time,
            update_time,
        },
    )?;
    println!("selected result {:?}", selected_bizs);


    Ok(())
}
代碼并不復雜,首先創建SslOpts,指定CA文件的位置;然后使用OptsBuilder 生成鏈接配置信息;最后創建Connection。后面是執行表創建以及驗證鏈接,最后是對標的 insert 和 select 操作。
sqlx
sqlx(https://github.com/launchbadge/sqlx)是純 Rust 編寫的異步 SQL Crate。
依賴
[dependencies]
# sqlx
sqlx = "0.6.2"
代碼
use futures::TryStreamExt;
use sqlx::mysql::MySqlPoolOptions;


#[tokio::main]
async fn main() {
    let sqlx_opts = sqlx::new()
        .host("gateway01.us-east-19.prod.aws.tidbcloud.com")
        .port(4000)
        .database("test")
        .username("tidbcloudtier.root")
        .password("xxxxxxxxxxxx")
        .ssl_ca("/etc/ssl/cert.pem");


    let pool = MySqlPoolOptions::new()
        .connect_with(sqlx_opts)
        .await
        .unwrap();


    let mut rows = sqlx::query("select * from sample").fetch(&pool);
    while let Some(row) = rows.try_next().await.unwrap() {
        println!("row is {:?}", row);
    }
}
SeaORM
SeaORM(https://github.com/SeaQL/sea-orm)是在 sqlx 之上構建的 orm 框架。
依賴
[dependencies]
# SeaORM
sqlx = "0.6.2"
sea-orm = { version = "0.10.6", features = [ "sqlx-mysql", "runtime-async-std-native-tls", "macros" ] }
代碼
use sea_orm::ConnectionTrait;
use sea_orm::DbBackend;
use sea_orm::SqlxMySqlConnector;
use sea_orm::{FromQueryResult, Statement as sea_statment};
use sqlx::MySqlPool;


#[derive(Debug, FromQueryResult)]
pub struct SeaOrmBiz {
    pub id: i64,
    pub name: String,
    pub gender: Option,
    pub mobile: String,
    pub create_time: chrono::NaiveDateTime,
    pub update_time: chrono::NaiveDateTime,
}


#[tokio::main]
async fn main() {
    let sqlx_opts = sqlx::new()
        .host("gateway01.us-east-19.prod.aws.tidbcloud.com")
        .port(4000)
        .database("test")
        .username("tidbcloudtier.root")
        .password("xxxxxxxxx")
        .ssl_ca("/etc/ssl/cert.pem");


    let pool = MySqlPool::connect_with(sqlx_opts).await.unwrap();
    let db = SqlxMySqlConnector::from_sqlx_mysql_pool(pool);


    let rs = db
        .execute(sea_statment::from_string(
            db.get_database_backend(),
            "select 1 from dual;".to_string(),
        ))
        .await;
    println!(">>>>> Cipher in use from sea_orm:{:?}", rs);


    let biz: Vec = SeaOrmBiz::from_sql_and_values(
        DbBackend::MySql,
        r#"SELECT * FROM sample;"#,
        vec![],
    ))
    .all(&db)
    .await
    .unwrap();
    println!(">>>>> selet rs is {:?}", biz);
}
SeaOrm 依賴 sqlx。首先構建 sqlx::MySqlConnectOptions 然后根據 MySqlConnectOptions 構建 sqlx::MySqlPool 最后構建 sea_orm::SqlxMySqlConnector 用于與 mysql 通信。
Rbatis
rbatis:https://github.com/rbatis/rbatis
依賴
[dependencies]
# rbatis integration
rbs = "0.1.13"
rbatis = "4.0.44"
rbdc-mysql = "0.1.18"
代碼
use rbatis::FastDateTime;
use rbatis::Rbatis;
use rbdc_mysql::MySqlConnectOptions;
use rbdc_mysql::{driver::MysqlDriver, options::MySqlSslMode as rbdc_MysqlSslMode};
use rbs::to_value;
use serde::{Deserialize, Serialize};
use std::HashMap;


pub const TABLE_NAME: &str = "sample";


#[derive(Clone, Debug, Serialize, Deserialize)]
pub struct BizRbatis {
    pub id: Option,
    pub name: Option,
    pub gender: Option,
    pub mobile: Option,
    pub create_time: Option,
    pub update_time: Option,
}
rbatis::crud!(BizRbatis {}, TABLE_NAME);


#[tokio::main]
async fn main() -> std::Result<(), Box> {
    // rbatis 連接
    let rb = Rbatis::new();
    let opt = MySqlConnectOptions::new()
        .host("gateway01.us-east-19.prod.aws.tidbcloud.com")
        .port(4000)
        .database("test")
        .username("tidbcloudtier.root")
        .password("xxxxxxxxxx")
        .ssl_mode(rbdc_MysqlSslMode::VerifyIdentity)
        .ssl_ca("/etc/ssl/cert.pem");
    rb.init_opt(MysqlDriver {}, opt).unwrap();
    rb.get_pool().unwrap().resize(3);


    let sql_show_ssl_cipher = "SHOW STATUS LIKE 'Ssl_cipher'";


    let cipher_rbatis = rb
        .fetch_decode::>>(sql_show_ssl_cipher, vec![])
        .await;


    println!(">>>>> Cipher in use from rbatis: {:?}", cipher_rbatis);


    let sql_select_one = format!("select * from {} limit ?;", TABLE_NAME);
    let row = rb
        .fetch_decode::(&sql_select_one, vec![to_value!(1)])
        .await;
    println!(">>>>> rbatsis select result={:?}", row);


    Ok(())
}
首先,新建一個Rbatis struct;構建 rbdc_mysql::MySqlConnectOptions (rbdc 相當于java體系里的jdbc,是rbatis的衍生項目);最后通過配置好的 rbdc_mysql::MySqlConnectOptions 初始化 Rbatis。
后記
在這次實驗中筆者也試圖使用 Diesel(https://github.com/diesel-rs/diesel) 建立 mysql 安全連接,不過在編譯的時候失敗,未入門先放棄。Diesel 由于開發時間久遠,彼時各個數據庫的 rust 原生驅動缺失,所以大量采用 c/c++ driver進行構建,這次編譯失敗也是因為在macos上找不到 mysqlclient 導致。有對 Diesel 強依賴的同學可以繼續探索。
再來說說對 SeaOrm 和 Rbatis 的直觀感受。SeaOrm 構建實體比較麻煩,如果不是通過工具手工構建實體比較燒腦;實體中包含各種與其他實體的關系;動態sql 可以通過 sea_query 工具包來構建。Rbatis 構建實體心智負擔就小很多,一張表一個實體;動態 sql 可以通過 HtmlSql 和 PySql 實現,sql 與代碼充分解耦。rbdc 作為 Rbatis 的衍生項目,顯然是要做 rust 生態的JDBC。從感覺上來講 SeaOrm 更像 hibernate;而 Rbatis 是復刻 Mybatis。
數據庫是應用程序打交道最多的外部資源,相關話題也很多,有機會再和大家聊聊 rust 與 數據庫打交道的更多細節。
編輯:黃飛
?


 工商網監
工商網監
評論