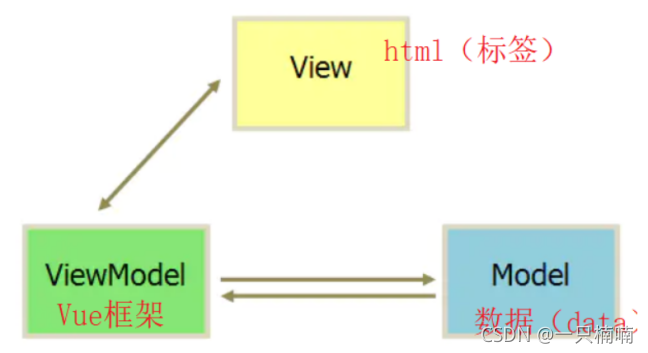
 在iOS中渲染vue與事件處理是什么
上一節我們已經完成了在iOS中集成vue,并成功拿到了創建Node的數據回調,這一節我們來完成Node的建立與渲染,并完成事件支持。
「第一步: 定義Node節點的數據結構」
具體定義如下:
@interface DomNode : NSObject
/// DomNode的標識符
@property (nonatomic, copy)NSString *ref;
/// 節點的類型(這里暫時定義四種,滿足Demo的需要就可以了)
@property (nonatomic, assign)DomNodeType type;
/// 節點的渲染屬性,需要在渲染的時候展示出來的(其中有一部分是與布局屬性重合的:即在布局屬性里面也需要在渲染屬性里面)
@property (nonatomic, strong)DomAttribute *attribute;
/// 節點的布局屬性,用于Flex布局計算
@property (nonatomic, strong)DomStyle *style;
/// 父節點
@property (nonatomic, weak)DomNode *parent;
/// 子節點
@property (nonatomic, strong)NSMutableArray
在這個數據結構中DomStyle是用于參與布局計算的, DomAttribute用于渲染。
他們的具體數據結構如下:
@interface DomStyle : NSObject
@property (nonatomic, assign) YGDirection direction;
@property (nonatomic, assign) YGFlexDirection flexDirection;
@property (nonatomic, assign) YGJustify justifyContent;
@property (nonatomic, assign) YGAlign alignSelf;
@property (nonatomic, assign) YGAlign alignItems;
@property (nonatomic, assign) YGPositionType positionType;
@property (nonatomic, assign) YGWrap flexWrap;
@property (nonatomic, assign) YGOverflow overflow;
@property (nonatomic, assign) YGDisplay display;
@property (nonatomic, assign) int flex;
@property (nonatomic, assign) int flexGrow;
@property (nonatomic, assign) int flexShrink;
@property (nonatomic, assign) DomEdge position;
@property (nonatomic, assign) DomEdge margin;
@property (nonatomic, assign) DomEdge padding;
@property (nonatomic, strong) DomBorder *border;
@property (nonatomic, assign) CGFloat height;
@property (nonatomic, assign) CGFloat width;
@property (nonatomic, assign) CGFloat maxWidth;
@property (nonatomic, assign) CGFloat minWidth;
@property (nonatomic, assign) CGFloat maxHeight;
@property (nonatomic, assign) CGFloat minHeight;

- (instancetype)initWithData:(NSDictionary *)data;
- (void)updateStyleWithData:(NSDictionary * _Nullable)data;
- (void)fill:(YGNodeRef)ygNode;
@end
style中的數據結構比較簡單,需要注意的是在初始化相關屬性時,需要與Yoga定義的YGNodeRef中的數據結構初始化值一致,因為我們在fill方法會把所有支持的屬性全部同步到YGNodeRef。
updateStyleWithData與initWithData所傳遞進來的則是從vue中拿到的回調數據,并將他們解析成對應的屬性值。
具體的實現代碼,我會附加在最后。
@interface DomAttribute : NSObject
@property (nonatomic, strong) NSString *color;
@property (nonatomic, strong) NSString *backgroundColor;
@property (nonatomic, assign) NSInteger fontSize;
@property (nonatomic, strong) NSString *fontFamily;
@property (nonatomic, strong) NSString *value;
@property (nonatomic, strong) NSString *imageNamed;
@property (nonatomic, assign) NSInteger maxNumberLine;
@property (nonatomic, strong) DomBorder *border;

- (instancetype)initWithData:(NSDictionary *)data;
- (void)updateAttributeWithData:(NSDictionary * _Nullable)data;
@end
這里需要注意的是,某些數據不僅參與計算,還參與渲染,比如: border。
其他的數據結構定義的實現代碼,我會附加在最后。
「第二:構建渲染樹」
定義好Node所需要的數據結構之后,我們就可以將回調數據解析成一個Node Tree了。
- (void)_handleCallNativeCallback:(NSString *)instanceId data:(NSDictionary * _Nonnull)data {
    if(!data) return;
    NSDictionary *info = data[@"0"];
    if(!info || ![info isKindOfClass:[NSDictionary class]]) return;
    NSString *method = info[@"method"];
    if(method.length == 0) return;
    if([method isEqualToString:@"createBody"]) {
        [self _createBody:instanceId data:info];
    } else if([method isEqualToString:@"addElement"]) {
        [self _addElement:instanceId data:info];
    } else if([method isEqualToString:@"updateAttrs"]) {
        [self _updateAttrs:info];
    } else if([method isEqualToString:@"updateStyle"]) {
        [self _updateStyles:info];
    } else if([method isEqualToString:@"createFinish"]) {
        [self _createFinished];
    } else {
        NSLog(@"data: %@", data);
    }
}
具體方法實現代碼,附加在后面。
通過對callNative的處理,在createFinished時構建好Node Tree。
「第三:完成布局前的準備工作」
構建好Node Tree,就可以通知Yoga,可以開始計算布局了。
在通知Yoga之后,需要將屬性映射到YGNodeRef Tree。
- (void)fill {
    [self.style fill:_ygNode];
    for(DomNode *child in _children) {
        [child fill];
    }
    _dirty = NO;
}
通過從根節點Node深度遍歷調用fill方法,將數據映射到YGNodeRef,這里需要注意的是,具體的fill方法是在style中實現的,因為只有style里面的屬性會參與計算。
具體的實現代碼如下:
- (void)fill:(YGNodeRef)ygNode {
    YGNodeStyleSetDirection(ygNode, _direction);
    YGNodeStyleSetDisplay(ygNode, _display);
    YGNodeStyleSetFlexDirection(ygNode, _flexDirection);
    YGNodeStyleSetJustifyContent(ygNode, _justifyContent);
    YGNodeStyleSetAlignSelf(ygNode, _alignSelf);
    YGNodeStyleSetAlignItems(ygNode, _alignItems);
    YGNodeStyleSetPositionType(ygNode, _positionType);
    YGNodeStyleSetFlexWrap(ygNode, _flexWrap);
    YGNodeStyleSetOverflow(ygNode, _overflow);
    YGNodeStyleSetFlex(ygNode, _flex);
    YGNodeStyleSetFlexGrow(ygNode, _flexGrow);
    YGNodeStyleSetFlexShrink(ygNode, _flexShrink);
    if(_width >= 0) YGNodeStyleSetWidth(ygNode, _width);
    if(_height >= 0) YGNodeStyleSetHeight(ygNode, _height);
    if(_minWidth >= 0) YGNodeStyleSetMinWidth(ygNode, _minWidth);
    if(_minHeight >= 0) YGNodeStyleSetMinHeight(ygNode, _minHeight);
    if(_maxWidth >= 0) YGNodeStyleSetMaxWidth(ygNode, _maxWidth);
    if(_maxHeight >= 0) YGNodeStyleSetMinWidth(ygNode, _maxHeight);
    YGNodeStyleSetBorder(ygNode, YGEdgeAll, _border.width);
    /// Padding
    if(self.padding.left >= 0)     YGNodeStyleSetPadding(ygNode, YGEdgeLeft, self.padding.left);
    if(self.padding.top >= 0)      YGNodeStyleSetPadding(ygNode, YGEdgeTop, self.padding.top);
    if(self.padding.right >= 0)    YGNodeStyleSetPadding(ygNode, YGEdgeRight, self.padding.right);
    if(self.padding.bottom >= 0)   YGNodeStyleSetPadding(ygNode, YGEdgeBottom, self.padding.bottom);
    /// Margin
    if(self.margin.left >= 0)      YGNodeStyleSetMargin(ygNode, YGEdgeLeft, self.margin.left);
    if(self.margin.top >= 0)       YGNodeStyleSetMargin(ygNode, YGEdgeTop, self.margin.top);
    if(self.margin.right >= 0)     YGNodeStyleSetMargin(ygNode, YGEdgeRight, self.margin.right);
    if(self.margin.bottom >= 0)    YGNodeStyleSetMargin(ygNode, YGEdgeBottom, self.margin.bottom);
    /// Position
    if(self.position.left >= 0)    YGNodeStyleSetPosition(ygNode, YGEdgeLeft, self.position.left);
    if(self.position.top >= 0)     YGNodeStyleSetPosition(ygNode, YGEdgeTop, self.position.top);
    if(self.position.right >= 0)   YGNodeStyleSetPosition(ygNode, YGEdgeRight, self.position.right);
    if(self.position.bottom >= 0)  YGNodeStyleSetPosition(ygNode, YGEdgeBottom, self.position.bottom);
}
構建好YGNodeRef Tree之后就可以進行布局的計算了
CGSize screenSize = self.view.bounds.size;
YGNodeCalculateLayout(ygNode, screenSize.width, screenSize.height, YGNodeStyleGetDirection(ygNode));
通過調用以上接口,計算好每個元素的位置與大小。
這里需要注意的是,screenSize并不是一定要傳遞屏幕大小,我們需要渲染到的目標視圖是多大,就傳遞多大。
在這里我們剛好使用了整個屏幕
「第四:開始渲染」
完成布局計算后,就開始對Node進行渲染了,代碼很簡單:
由于是測試代碼,所以只是簡單的完成了渲染,沒有進行優化。
實際上這里應該將不同節點在原生對應的元素定義出來,通過元素內部的方法進行循環渲染,使代碼結構更簡單。
- (void)_render:(DomNode *)node superView:(UIView *)superView {
    if(!node) return;
    for(DomNode *child in node.children) {
        UIView *childView = NULL;
        if(child.type == DomNodeTypeLabel) {
            UILabel *label = [[UILabel alloc] init];
            label.font = [UIFont systemFontOfSize:child.attribute.fontSize];
            label.textColor = [UIColor colorWithHexString:child.attribute.color alpha:1.0f];
            label.text = child.attribute.value;
            childView = label;
        } else if(child.type == DomNodeTypeView) {
            UIView *view = [[UIView alloc] init];
            view.backgroundColor = [UIColor colorWithHexString:child.attribute.backgroundColor alpha:1.0f];
            childView = view;
        } else if(child.type == DomNodeTypeButton) {
            UIButton *button = [[UIButton alloc] init];
            [button setTitle:child.attribute.value forState:UIControlStateNormal];
            [button setTitleColor:[UIColor colorWithHexString:child.attribute.color alpha:1.0f] forState:UIControlStateNormal];
            button.titleLabel.font = [UIFont systemFontOfSize:child.attribute.fontSize];
            childView = button;
        }
        childView.frame = child.rect;
        childView.backgroundColor = [UIColor colorWithHexString:child.attribute.backgroundColor alpha:1.0f];
        [superView addSubview:childView];
        childView.node = child;
        if(child.events.count > 0) {
            for(NSString *event in child.events) {
                if([event isEqualToString:@"click"]) {
                    childView.userInteractionEnabled = YES;
                    UITapGestureRecognizer *tap = [[UITapGestureRecognizer alloc] initWithTarget:self action:@selector(_clickEvent:)];
                    [childView addGestureRecognizer:tap];
                }
            }
        }

        if(child.children.count > 0) {
            [self _render:child superView:childView];
        }
    }
}
完成渲染之后,是這樣一個效果:
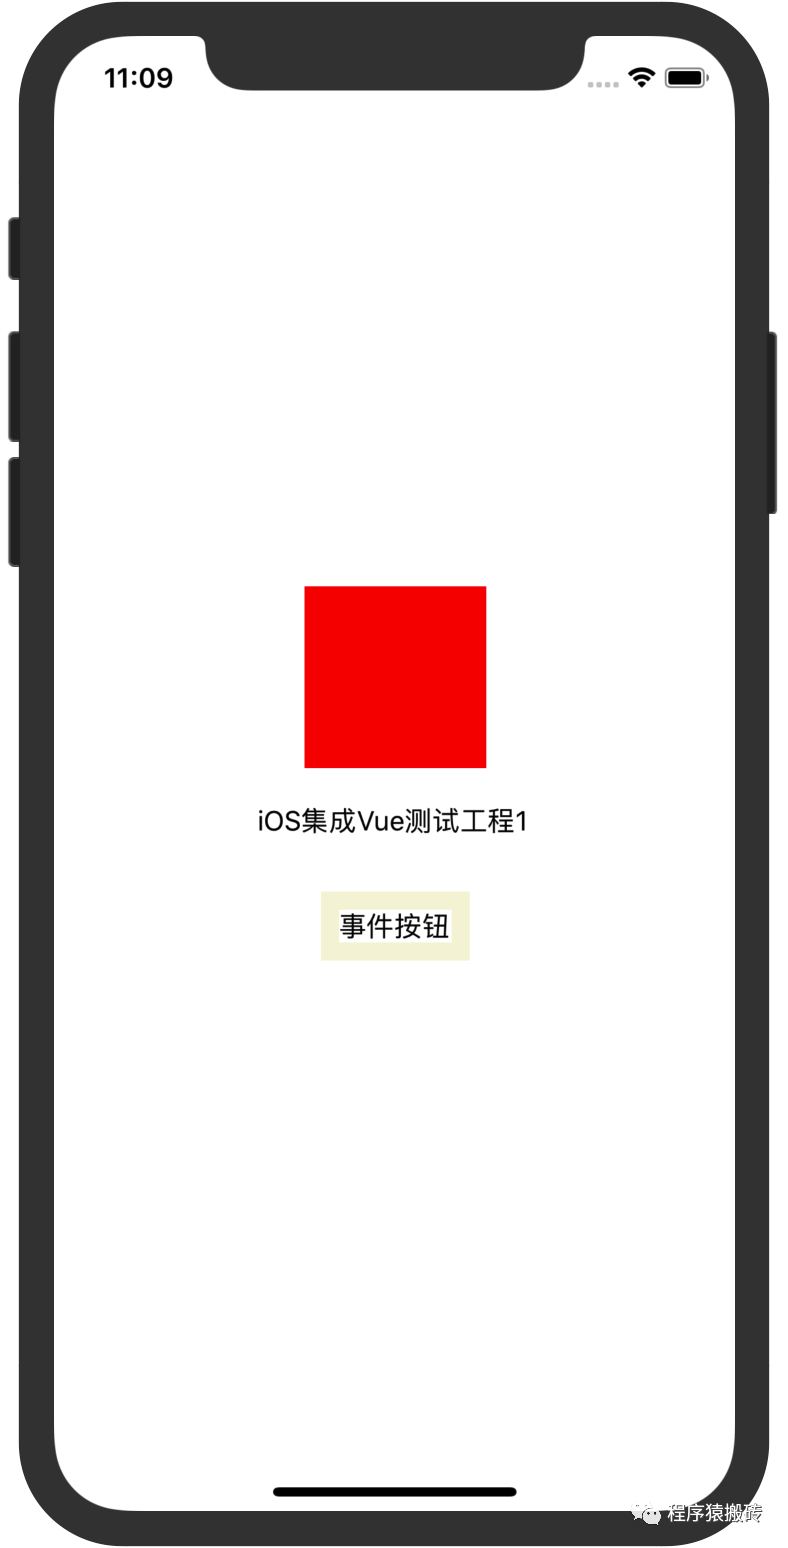
「第五:處理事件」
樣式的渲染不是一層不變的,最容易想到的就是事件會改變數據的狀態,那么事件怎么傳遞給vue呢。
vue-weex-framework在加載之后,會在globalObject上掛載一個方法__WEEX_CALL_JAVASCRIPT__,通過JSContext來調用這個方法,將事件與事件掛載的元素id傳遞過去,就完成了在vue內部的事件調用。
代碼如下:
- (void)sendEvent:(NSString *)ref event:(NSString *)event {
    NSLog(@"IOS Context收到事件: %@, %@", ref, event);
    NSDictionary *params = @{
        @"module": @"",
        @"method": @"fireEvent",
        @"args": @[
            ref,
            event
        ]
    };
    NSArray *args = @[@"1", @[params]];
    [[_context globalObject] invokeMethod:@"__WEEX_CALL_JAVASCRIPT__" withArguments:args];
}
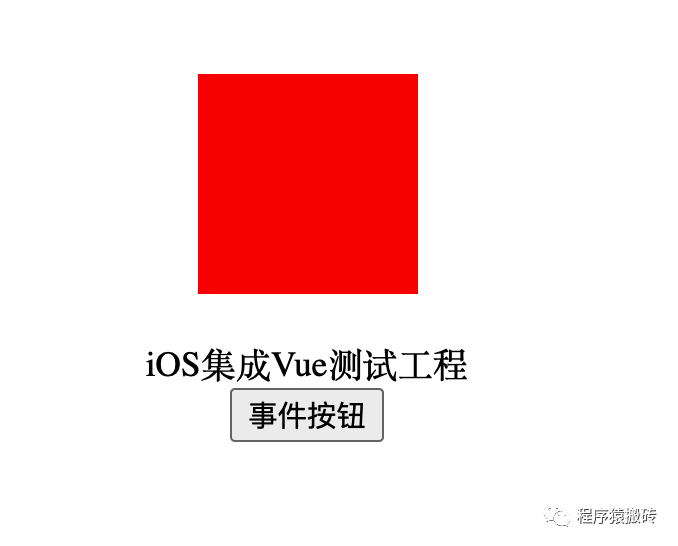
完成了事件的渲染,我們來看看具體的效果

**「這里有一個點需要注意一下:
1.當數據發生變化的時候,怎么讓原生感知它的變化呢,這里我使用了CADisplayLink,每一幀都去檢測一下Node Tree是否已經發生改變,如果有節點發生改變,就需要重新計算。
慶幸的是Yoga在內部是有緩存的,當我們標記了某一個節點需要重新計算后,Yoga會去判斷哪些相關節點需要重新計算,不需要計算的則不會再計算了。
這樣就會大大減少數據更新計算布局的時間了。
2.如果使用div來顯示文本,在數據發生改變時不會調用updateAttrs,需要使用text標簽顯示會發生改變的文本信息
」**
到這里,我們基本上完成了從vue到渲染成原生的所有步驟,當然里面還有一些細節是沒有處理好的,比如在加載vue模板的時候還可以傳遞一個json數據進去作為從原生代入的初始數據。
整體的骨架已經有了,感興趣的朋友優化骨架完善細節就是接下來。
「總結:」
這個小系列分為三個小節,實例了一個有基本骨架結構的渲染vue代碼的引擎:
1.完成從vue開發到打包成非瀏覽器環境使用的代碼,完成vue-js-framework打包
2.將打包好的framework與vue模板代碼集成到iOS當中
3.完成渲染與事件處理
寫到最后:
本文章以iOS平臺為宿主環境,很容易的你能想到將這個引擎擴展到android,或者更多的平臺。
「附加資料:」
iOS-Vue-Demo: https://github.com/czqasngit/iOS-Vue-Demo
vue: https://cn.vuejs.org/
weex-framework:
https://github.com/apache/incubator-weex
webpack:
https://webpack.js.org/
-
iOS
+關注
關注
8文章
3399瀏覽量
150979 -
node
+關注
關注
0文章
23瀏覽量
5951 -
vue
+關注
關注
0文章
58瀏覽量
7893
發布評論請先 登錄
相關推薦
用WEB技術棧開發NATIVE應用(二):WEEX 前端SDK原理詳解
前端渲染引擎的優勢分析

Vue入門之Vue定義


 工商網監
工商網監
評論